Building a Free WordPress Glossary Plugin Using ChatGPT
A free WordPress glossary plugin that met my criteria was hard to find.
So I made my own with ChatGPT.
Introduction
WordPress is a powerful CMS with lots of functions that can take your website to the next level. However, building a website using WordPress and navigating the tens of thousands of plugins available is no easy task, especially without overspending.
Many WordPress plugins are free, but many require payment if you need more than basic functionality. Some plugins may not work perfectly with your website or theme and could potentially cause issues that impact your visitors or your business. Since this is a tech blog, it would make sense to have a glossary for all the difficult words out there. It would also be nice for the visitors to read what it means without having to exit the website figuring this out themselves.
This meant I needed a plugin to manage all the technical terms, such as:
ROM, RAM, CPU, NAS, and more.
Why I built my own plugin
Finding a free wordpress glossary plugin was no easy task. I found a couple of plugins that seemed promising, but only had basic functionality unless I was willing to spend more (e.g., $50 per year). Either that, or I didn’t like how they worked or looked.
Here were my criteria:
- Mobile-friendly
- Glossary page
- Display tooltips correctly and in the styles that I wanted
- Ability to have different text in the tooltip and on the glossary page itself, allowing for more in-depth explanations.
- Affordable, preferrably free
- Proper SEO settings for the glossary pages
- Ability to open a glossary term in its full context without leaving the article, instead opening it in a new page
- Exclude tooltips from appearing inside the glossary page itself
- A tooltip text with a limit of 300 characters
- Automatically detect and apply tooltips to terms in posts without needing to add tags manually (but not on the homepage)
- Case sensitivity ensures that only the exact term is matched (e.g., it recognizes ‘CPU’ but not ‘cPu’, ‘CPu’, or ‘cPU’, and it does not match terms that contain the word, like ‘NASA’). But ‘NAS’ works, of course.
After searching for hours and finding nothing that didn’t mean overspending, I thought: “Hey, I pay for an amazing tool called ChatGPT! Maybe I can use it to create my own plugin just the way I want it!” It was no easy task to get ChatGPT to make my free WordPress glossary plugin work perfectly. I had to be direct and ask it to rewrite the code several times. After about eight hours, I finally had it the way I wanted—though there might still be some room for improvement in certain areas.
Building the first version of my free WordPress Glossary Plugin
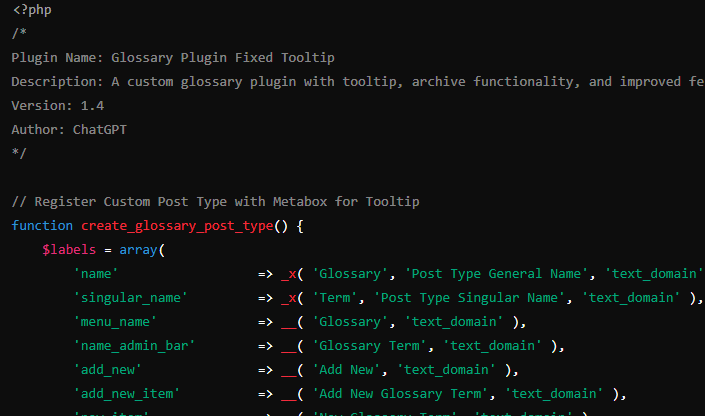
So I asked ChatGPT if it could help me build a free WordPress Glossary Plugin and shared some of my criteria. It quickly started generating code. I began with the basics, like adding glossary terms and displaying them in a tooltip.

I was mind blown and excited – the first code was done! I uploaded the script to the server, and looked for it in my Plugins list. There it was. I was thrilled to try it out and activated it!

It looked pretty average and worked ok-ish, it was a square box without any nice styling and white text. This meant I had a nice baseline for my new plugin and could use this code to further improve it with ChatGPT.
I then wanted a separate text box in the WordPress editor for the Tooltip Text. The tooltip text is a brief description, up to 300 characters, that provides a quick explanation of a term or abbreviation, such as for example: RAM (Random Access Memory). It appears when users hover over or tap on highlighted words, offering concise and useful information.
I asked ChatGPT to create a text box in the editor, allowing me to display the quick explanation directly. If a visitor wants to read more, they can click the word once, which will open a new page with the glossary article, providing a detailed explanation of the key points.

Then it was time to test the script, and it worked – amazingly. Please note that getting the text box for the tooltip into the editor wasn’t easy, ChatGPT encountered some challenges with this. But after a few attempts, it finally worked.

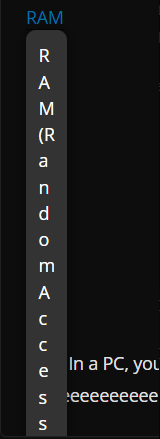
This didn’t look great; it was, at best, mediocre. I also tried to make it more user-friendly for smaller screens like tablets and cell phones, but this turned out to be a mistake since the theme was already mobile-friendly. As a result, the script and the theme conflicted over the layout, causing the tooltip to display vertically instead of horizontally.

After fiddling with making it mobile-friendly, I thought, why not keep it simple? I tested it on my computer and phone, and the tooltip looked good. So, I reverted to the old script and added some nice borders with rounded corners and a yellow theme color.
One issue, without breaking the script, is that if the text is too far to the right, it could create a long vertical line.
When I tried getting ChatGPT to fix this, it ended up making things worse, for example, by displaying it to the left of the word or making it vertical, among other odd results. I decided it was better to review the articles more thoroughly before publishing.
I think ChatGPT and I (mainly ChatGPT) spent about 45 minutes working on the visual aspects before I decided it was good enough and moved on to creating the Glossary Archive page. Please note that this is the initial version of the script and not the final one. You can read more about the latest version towards the end.
Glossary Archive Requirements
There were several requirements I had for a glossary page:
- Search Function: A search bar that allows users to quickly find specific terms.
- Alphabetical Order: Terms should be listed in alphabetical order for easy navigation.
- Accurate Listing of Glossaries: All glossary terms should be displayed correctly without duplicates or errors.
- Responsive Design: The glossary page should look good and be easy to use on both desktop and mobile devices.
- Filter Options: Ability to filter terms by category or tags to help users find related terms more easily.
- Pagination: If there are many glossary entries, breaking them into pages can make navigation smoother.
- SEO Optimization: The glossary page should be optimized for search engines, helping each term rank well in relevant searches.
- Links to Related Articles: Option to include links to blog posts or articles related to each glossary term.
- Clear Definitions: Each term should have a concise, easy-to-understand definition that helps the user grasp the concept quickly.
- Exclude Glossaries in Archive Articles: Glossary terms should not be displayed within articles on the archive page itself
It’s a bit of a list of requirements, but I think it’s fair to want something that looks professional without overspending. And in the end, the final version actually delivered!
Making the Glossary Archive page
After deciding that the visual aspect of the plugin ChatGPT and I created looked good, it was time to build the archive page for all the glossary terms.
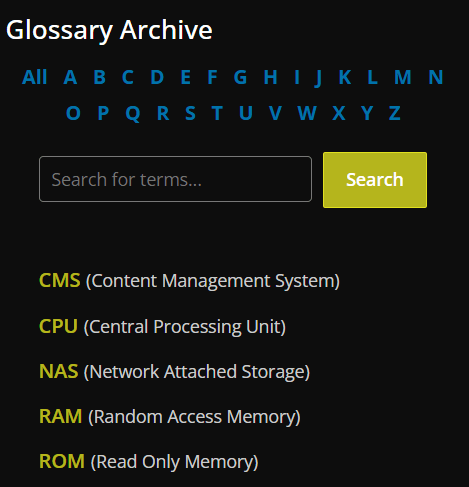
I told ChatGPT that I wanted a glossary archive page with a search function and an alphabet filter, where users can select a letter and see all glossary terms starting with that letter.
I also wanted it to include a search feature where users could search for a specific term or word, such as ‘Storage,’ and it would result in e.g. NAS being shown. This was no easy task and took several attempts before it worked as intended.
I had to ask ChatGPT to create an additional text field so that terms like ‘Storage’ would appear in the list of glossary entries even if users searched for the broader term rather than the abbreviation like ‘NAS’.
The abbreviation’s full form field would cover this and display after the short words in parentheses in the glossary list.
There were several attempts before I was satisfied with the glossary archive page and its functionality.
When creating the glossary archive page, I shared my criteria with ChatGPT and asked it to build the page in a separate file called glossary-archive.php, which would work alongside the main script. This approach ensured that the original script (glossary-plugin.php) remained unchanged, as it was already functioning as intended.
ChatGPT created the new script for glossary-archive.php, and I gave it a try. It barely functioned as intended. The alphabet and search field were white, and the glossaries only displayed terms without their definitions. The search function was poor and didn’t integrate well with the alphabet filter. For example, you could click on ‘N’ for NAS, and it would display as intended, which seemed fine at first.
But then, another problem was revealed —if a letter like ‘N’ was already selected, searching for something else, like ‘CPU’, wouldn’t show any results because the letter filter remained in URL field. This led to more instructions and attempts, and after a while, everything finally worked as intended.
Now I had a working glossary archive with an alphabet filter and search function that functioned properly.
But then I thought: ‘NAS’ isn’t very descriptive for visitors—what if they’re looking for terms related to, say, ‘storage’? This led me to add another text field in the editor to clarify what each term stands for. I wanted this text to appear in parentheses after the term, giving a brief explanation and making it easier for users to find other glossary terms with similar functions or keywords.
I asked ChatGPT to code this in. The new text field in the editor was named ‘Abbreviation Full Form’ and would display text in parentheses after each term on the archive page. After a few styling adjustments—since the text in parentheses was the same size as the term, which didn’t look quite right—I requested that the text be made smaller. This looked much better and matched exactly what I was aiming for. In the final version, this page is nearly identical, with only a few minor styling tweaks.

Finalizing and Optimization
Once the visuals and archive page were finalized, we focused on refining the script to enhance performance, reduce redundancies, and ensure efficient use of resources. Here are the key changes we implemented:
- Code Review and Redundancy Removal: ChatGPT identified several lines of code that were either redundant or unnecessary. By removing these, the script became more streamlined and easier to maintain. This also improved the overall efficiency of the plugin by eliminating superfluous operations that added no value to the functionality.
- Security Enhancements: During the review, potential security issues were flagged and addressed. This included sanitizing user inputs, particularly for the search functionality and inside the URL parameters, ensuring that no malicious data could be injected or executed within the system.
- Access Control: Ensured proper capability checks for administrators to manage glossary terms effectively.
- Separate CSS-styling: The styles were moved from the scripts to dedicated CSS files to optimize the script for caching purposes.
These improvements led to a leaner, faster, and more secure plugin that minimized the server’s load while providing a smoother experience for users interacting with the glossary terms.
Final Verdict
Using ChatGPT to create this was a was a mix of fun, challenges, and some frustrating moments, but it left me with a real sense of accomplishment. I learned a lot along the way, and ChatGPT proved to be a very helpful, powerful, and intriguing tool. We’ve come a long way with AI, and it’s clear that it will evolve even further in the future—but that’s probably a topic for another post.
Instead of paying $50 a year for another plugin that I’d have to adjust and set up to my liking—something that might not even be possible—ChatGPT turned this into a fun experiment, and I’m very happy with the result. Of course, there’s still room for improvement.
One aspect I’m not entirely satisfied with is how the tooltip adjusts when it’s too far to the right; it breaks the line and ends up displaying as a vertical letterbox.
All in all, considering ChatGPT’s current cost of $20/month, this plugin ultimately cost me about $0.22 (22 cents) in total after eight hours of work.
Final Script Version
Reworking the Glossary Tooltip
After spending a lot of time reviewing all the articles on different devices, I noticed that the glossary tooltip was often positioned too far to the right. This meant I had to either add extra words or create a new line for the text, as the tooltip would ‘break’ otherwise. At that point, I thought, ‘Let’s rework the visual design and create a centered box with a cleaner style.’
I asked ChatGPT to remove any functions displaying the tooltip box on every article or page and create a new method for opening tooltips. This change was especially needed for mobile users, as tapping to display the tooltip was awkward. On a PC, hovering over the word worked fine, but on mobile, it required a very precise touch, making it frustrating to use.
Rebuilding the glossary tooltip functionality became essential for both of us:
- For me, it saved countless hours of post-review, preventing the tooltip box from breaking vertically if placed awkwardly.
- For you, it removed the hassle of needing to perfectly tap and scroll just to view the tooltip. Without this fix, a slight mis-tap could open a new page with the glossary term, which was far from ideal.
- For both cases, when using a tooltip, it adapted to the different text sizes. If the glossary text was bold, it appeared bold; if it was in a header, it kept the same size. You get the idea—it looked pretty odd.
So, I explained to ChatGPT how I wanted the tooltip to function, and it created a new JavaScript file that handled the tooltip exactly as I envisioned. My goal was to allow users to open the glossary tooltip box on the same page (without redirecting) and have a ‘Read More’ button that would open the glossary page in a new tab. I also wanted it to be user-friendly, so I specified three ways to close the tooltip after clicking it:
- Pressing the ‘X’ in the top-right corner
- Clicking outside the tooltip box
- Pressing the Escape key if using a computer
ChatGPT made the tooltip box:

The first version of the script didn’t look great. A white text field with a gray-ish background? Yikes… So, it was back to the drawing board—or, in this case, back to ChatGPT!
Back to ChatGPT!
This setup worked great. Next up was the styling. I wanted a clean box with rounded corners and a yellow line to match the Nuvorix theme, along with a darker background to make the tooltip text easier to read. And that was it! ChatGPT needed a few attempts to get it just right, but it didn’t take much time at all, surprisingly!

But after a few more instructions, a cup of coffee, and a bit of fiddling in the CSS file myself, we got this!
The tooltip styling was now finished, and it turned out exactly how I wanted it.
You can try it again here if you’d like: ‘DSL’
This was perfect for me because, regardless of the text size—whether it was bold, in a paragraph, or a header—it now displays at a consistent size.
Adding CACHE and Final Tuning
Happy with how the plugin was working, it was time to optimize it even further. Cache implementation was added to reduce server load. I wanted the caching script to function so that, if a page or post has 5 glossary terms, only those 5 terms would be cached—not the entire glossary at once! This turned out to be much harder than expected, and I was on the verge of losing my mind. Implementing caching became the ultimate test of my patience.
To monitor this, I wanted a Glossary Cache Log that would track which glossaries were missing (miss), which were cached (set), and which were retrieved from cache (hit). This was working, but the actual caching was still failing—a real nightmare.
Note: In the final version, ‘hits’ (retrieved from cache) aren’t displayed to avoid unnecessary server load. The log now only shows cache or log clear actions and new cached glossaries. It also automatically removes the oldest entries after 1,000 lines to keep things clean.
I also wanted additional pages for the Glossary script. Besides the Glossary Info page and Glossary Cache Log, I wanted a Glossary Cache page to display cached glossaries and include buttons to manually generate or clear the cache. Easy, right? Not at all!
After 4 or 5 hours with GPT-4, I was ready to give up. ChatGPT kept making strange changes, like removing lines, write the same script, or switching to my native language (Norwegian, by the way). Frustrated, I decided to give GPT o1-Preview a shot, despite my patience being paper-thin. I pasted the script, explained everything in detail, and, after just a couple of tries—bam! It finally worked! I was blown away and incredibly relieved.
After testing the script and cache for about an hour, I noticed that glossaries were still appearing in code or preformatted text. No big deal… I knew GPT-4-turbo could fix this tomorrow (I need sleep too!). And sure enough, it did—on the first try!
Cached glossaries are stored for one week (168 hours) and will automatically delete and rebuild the next time you visit a post or page containing glossaries. Later in the article, I’ll show you how to configure this easily.
Now, when a glossary entry is edited, the cache for that entry is automatically cleared and will rebuild on the next page load where the glossary is present.
Glossaries are cached using WordPress’s ‘Transient’ API, with each term stored under its unique ‘term_id’.
Small Fixes and Tweaks
Another issue was that I often display code where I don’t want the tooltip to trigger—usually in preformatted or code text fields. Like this:
Example text: To get the best out of your NAS, you should always use Ethernet cables or Optical connections instead of Wi-Fi and utilize SSD's for maximum speeds!
If this were code, the tooltips would trigger on ‘NAS’, ‘Ethernet’, ‘Wi-Fi’, and ‘SSD’s’, In a code, this is unnecessary and can be distracting.
I also decided there should be a limit of no more than 7 unique glossary terms triggering on a single page. Listing the same glossary term repeatedly throughout a post—where all the text, in my case, turns yellow with the same glossary popping up over and over—isn’t exactly ideal, right? Repetitive glossaries are annoying; they should work more like links, appearing only when necessary or to emphasize a point.
If you don’t want a glossary term to display on a specific page or article, you can use the tag: [gloss_ign]Glossary[/gloss_ign] to ignore it.
You can also use numbers and hyphens in glossary terms, which is especially useful in the IT world; examples include RJ45 and Wi-Fi.
Download this Free WordPress Glossary Plugin
Download this script for free on GitHub.
This plugin is released under the GPLv4 license, which grants you the freedom to use, modify, and distribute the plugin.
Under this license, you’re welcome to share and even adapt it to suit your needs, as long as it remains open and free for others to access and use. Commercial use or monetized redistribution, however, is not permitted.
Installation:
Download the Plugin:
Download the plugin zip file from this repository.Upload to WordPress:
Go to your WordPress dashboard, navigate to Plugins > Add New, and upload the zip file.Activate the Plugin:
Activate the plugin through the Plugins menu in WordPress.Use the Shortcode on a page where you want your archive:
[glossary-archive]- Use the shortcode on any page or post where you want to exclude specific glossary terms.
[gloss_ign]Glossary[/gloss_ign]
Editing and Tweaking the Script Yourself
The Glossary Plugin and the Glossary Archive each have their own CSS files, located in the ‘css’ folder, where you can make adjustments to ensure they integrate well with your page.
As for the JavaScript, there shouldn’t be any need to edit this.
glossary-plugin.php
- Change how many times a unique glossary has a tooltip, change the number in this line
$max_occurrences = 7;(Note: this is how many times one glossary is displayed, if you have different ones, all will display 7 times) - Change how many entries are logged in the Cache Log page, change the lines:
if (count($log) > 1000) {
$log = array_slice($log, 0, 1000); - Change how long the caching period is by changing this line:
set_transient($cache_key, $cached_term, 168 * HOUR_IN_SECONDS);
glossary-archive.php
- Change how many posts lists per page:
'posts_per_page' => 25, - Change the search field text:
echo '<input type="text" name="glossary_search" placeholder="Search for terms..." value="' . esc_attr($search_query) . '">'; - Change the text for “More terms are available…”:
echo '<p class="pagination-message">More terms are available. Please use the search feature to find a specific word or term, or browse through the pages below.</p>'; - Change pagination text:
'prev_text' => '«',
'next_text' => '»',

