How to Set Up Pi-hole with Unbound on Ubuntu 24.04: Network-Wide Ad Blocking Made Easy
Are you also tired of ads? Are they overwhelming and slowing your network down? Pi-hole for the rescue.
In this guide, I’ll show you how to set up Pi-hole on an Ubuntu Server running in a virtual machine (VM) on Proxmox VE. Pi-hole is a great tool for network-wide ad blocking, and by virtualizing it, you can easily manage and back up the environment.
What is Pi-hole and why should you use it?

Pi-hole is a free software that you can enable network-wide to block advertisements, tracking, or malicious domains. You control the blocklists and decide what is allowed on your network.
Why you should use Pi-hole
- Improved Network Performance: Pi-hole can significantly improve your network performance by blocking resource-heavy ads and trackers before they even load. This reduces bandwidth usage and speeds up browsing for all devices on your network.
- Customization and Control: One of Pi-hole’s strongest features is its flexibility. You can easily add custom blocklists or whitelist specific websites, giving you full control over what content is filtered or allowed on your network.
- Privacy Benefits: Pi-hole helps protect your privacy by preventing trackers and malicious domains from collecting data on your browsing habits. It acts as an additional layer of security for all the devices connected to your network.
- Compatibility: Pi-hole works seamlessly with any device connected to your network, whether it’s a smartphone, computer, smart TV, or even IoT devices. It offers network-wide ad-blocking without requiring any additional configuration on individual devices.
Why would you want to host your own personal recursive DNS server at home:
- Improved Privacy: When you host your own DNS server, you’re not relying on third-party DNS providers like Google or your ISP. This helps keep your browsing activity private, as DNS queries aren’t logged by external parties.
- Increased Control: Hosting your own DNS server gives you full control over DNS resolution. You can configure blocklists to prevent access to ads, trackers, or malicious websites, which is particularly useful when combined with Pi-hole.
- Faster DNS Resolution: With a local recursive DNS server, the queries for frequently visited sites are cached (CACHE) locally, reducing latency and potentially speeding up browsing across your network.
- Self-Sufficiency: By managing your own DNS, you’re less reliant on external services that might go down or experience slowdowns, giving you more consistent and reliable performance.
- Learning Opportunity: Running your own DNS server is a great way to learn more about networking.
Prerequisites
- A Proxmox environment with a new VM created for Ubuntu Server.
- A basic understanding of using PuTTY (SSH) and Proxmox.
- Access to your home network’s router for DNS changes or device administrator capabilities.
Install Ubuntu Server on Proxmox
Follow this easy guide to install Ubuntu Server 24.04 on Proxmox following this guide:
Install Ubuntu Server 24.04 on Proxmox
Logging in and updating the System
- First log in to your server using your credentials
- Make sure your server is up to date by running the following command (for now, you’ll have to write them manually):
- sudo apt-get update && sudo apt-get upgrade
- You will then be prompted for ‘[sudo] password for pihole:’. Enter your password and press ‘enter’
- After searching for updates, it will ask if you want to continue with the update. You can type ‘Y’ and press ‘Enter, but simply pressing ‘Enter’ will automatically select the default option, which is ‘Y’ (yes) from the Y/n prompt.
- Congratulations, for now, your server is up-to-date.
Installing Pi-hole using PuTTY
Installing and using Putty:
After updating the server, we’ll now switch to a SSH client where we can paste commands instead of manually writing them. We’ll use “PuTTY“.
Open the link above and download the installer. In this case, I am using Windows, so we’ll use the MSI (‘Windows Installer’), if your PC is pretty new, choose “64-bit x86”
After installing PuTTY, open it and enter the IP address from earlier, in my case: ‘10.0.2.205’ on port ’22’
Example:
Host Name (or IP address) | Port
10.0.2.205 | 22
Connection type: SSH
Click ‘Open’
After this, you will be prompted with a security alert. Click ‘Accept’.
Then log in with your credentials.
Installing Pi-hole:
- After logging in, we’ll proceed to set up Pi-hole using this command:
sudo curl -sSL https://install.pi-hole.net | bash
- Copy the command above and in PuTTY, right click to paste the command, then press ‘enter’, enter your password. The installer will do its thing
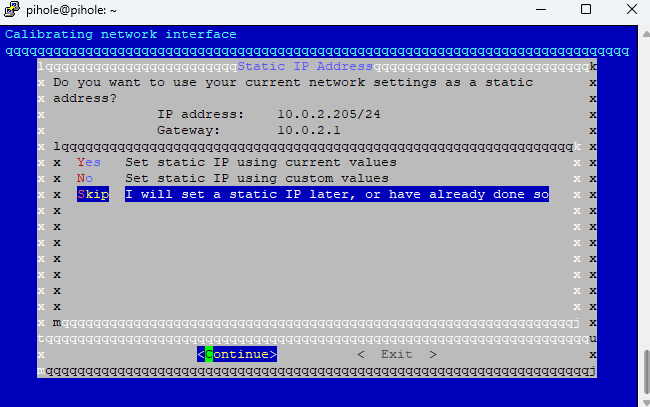
- Click ‘OK’ until you reach ‘Static IP Needed’. Later, you’ll need to set a static IP address for Pi-hole manually. For now, since we’re still in the setup phase, this is not necessary. Click ‘Continue’
- Then select ‘Skip’ as we will give Pi-hole a new IP address later, click ‘Continue’

We’ll skip this for now. - On the section: ‘Select Upstream DNS Provider’, select Google’s servers for now, and click ‘OK’ to continue.
- On ‘Blocklists‘, select ‘No’ for now, we’ll add more lists later.
- On ‘Admin Web Interface‘, select ‘Yes’, press ‘enter’ Then select ‘Yes’ on the next step as well
- ‘Enable Logging’: If privacy on your network is not a concern, such as home networks, select ‘Yes’ to enable ‘query logging’
- ‘Select a privacy mode for FTL‘: We’ll use ‘Show everything’ for this setup
- After Pi-hole finishes installing, you’ll need to set a new password. You can do this by running the following command:
pihole -a -p
You’ll be prompted to enter your password two times: One for your new Pi-hole password, and finally to confirm the Pi-hole password.
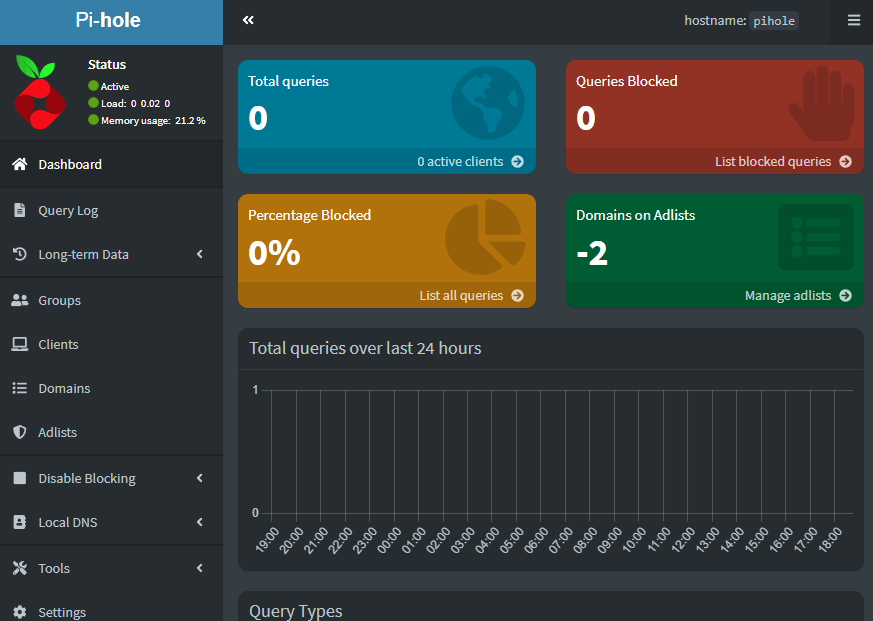
Now you can access your Pi-hole at: http://Pi-hole-IP/admin and login using your credentials
For now, Pi-hole looks empty and sad:
Set up a static IP address in your router
Pi-hole requires a static IP address to function properly, and this will need to be set up on your router. You’ll have to complete this step on your own, as the process varies depending on the router.
If you’re unsure how to assign a static IP address to your Pi-hole server, you can Google your router’s model for instructions. For example, I use ‘pfSense’.
Here are the general steps (only make changes if you have permission to modify the router settings):
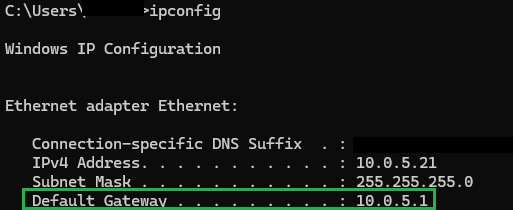
- Access your router: Open Command Prompt (press Win + R, type ‘cmd’, and press ‘OK’). In the Command Prompt, type ‘ipconfig’ and press ‘Enter’.
- Find the Default Gateway: Look for the “Default Gateway” in the output and enter this address into your web browser’s address bar.

Look for ‘Default Gateway’, this is most likely your router’s IP address - Once logged in, this is where things might require some technical experience. Every router is different, so figuring out how to set static IP addresses can be challenging and, in some cases, not even possible.
- Look for sections labeled something like:
‘LAN’,
‘LAN Setup’,
‘DHCP’, or
‘DHCP Settings’.You might need to browse around before you find the correct section. Be careful not to change settings unless you’re sure of what you’re doing.
If you’ve looked everywhere but still can’t find where to set a static IP, try Googling your router’s brand and model with terms like “Router [model] static IP setup” (e.g., “pfSense static IP setup”). - Once you find the right section, you’ll need three pieces of information:
1.) What IP addresses are already in use.
2.) The IP address you want to assign to Pi-hole.
3.) The MAC address of your Pi-hole server.
If you’ve forgotten the server’s IP or MAC address, you can retrieve it by running this command:ip add
Then press ‘enter’. Ignore 127.0.0.1, as that is the loopback address and not the one you’re looking for.

The red square is the wrong place. The green square is the MAC address we need for setting a static IP address. The yellow line is the current IP address of Pi-hole - When you have figured out where to set a static IP, fill it in with the IP address you want (take a look at leases so you won’t run into any conflicts with other devices). Then fill out MAC address and the IP address you want Pi-hole to use.

DHCP reservation (pfSense) - After reserving Pi-hole in your router’s DHCP server, you can restart your server using the command:
sudo reboot
Alternatively (optional), if you have limited memory, you can set Pi-hole to use only 512 MiB of RAM (this step is optional). Here’s how:
Shut down the server using this command:sudo shutdown
Wait for about a minute to ensure the server is fully powered down.
- When the server is off, click on it, navigate to Proxmox -> ‘101 (Pi-hole) -> ‘Hardware’ -> ‘Memory’ -> enter ‘512’ -> Click ‘OK’. For reference, I have a Pi-hole server running on my home network serving 41 clients with over 2 million domains blocked, and with 512 MiB RAM, it’s only utilizing 53%.
- Right-click on the server and select ‘Start’
- Open PuTTY again and connect using the new static IP address you set earlier.
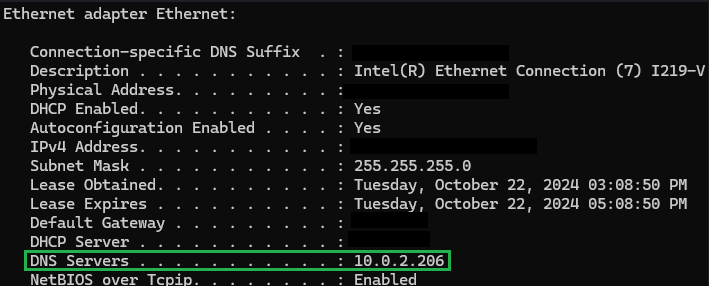
- You can now update your operating system’s DNS servers by opening ‘CMD’. Press Win+R, type CMD, and click OK. In the Command Prompt window, type ipconfig /renew and press Enter. After a short while, your new DNS server should appear when you type ipconfig /all.

This is what your command prompt should display after renewing your ‘ipconfig’. Sensitive network details have been censored for security reasons. - You can also configure this manually for each device, but it’s more efficient to manage it centrally through your DHCP settings if you want all devices to use your new DNS server.
To change the DNS server in Windows, follow these steps:- Right-click the Windows button in the bottom left and select Settings.
- Go to Network & Internet.
- Choose Ethernet if you’re using a wired connection, or Wi-Fi if using wireless.
- Click on the interface you’re currently using (e.g., your Wi-Fi or Ethernet connection).
- Scroll down to DNS server assignment and click Edit.
- Select Manual, and tick IPv4.
- In the Preferred DNS field, enter the IP address of your new DNS server.
After following these steps, your device will use the new DNS server.
Set up Unbound – Your own recursive DNS server
In this step, we will configure Unbound, this is a DNS resolver that will allow Pi-hole to act as its own recursive DNS server, giving you full control over DNS resolution without relying on third-party providers.
Install Unbound
SSH into your Pi-hole server and install Unbound by running the following command:
sudo apt install unbound -y
Configure Unbound
Once Unbound is installed, we need to configure it:
- Create and edit the Unbound configuration file for Pi-hole:
sudo nano /etc/unbound/unbound.conf.d/pi-hole.conf
- Paste the following configuration into the file:
server:
# If no logfile is specified, syslog is used
# logfile: "/var/log/unbound/unbound.log"
verbosity: 0

interface: 127.0.0.1
port: 5335
do-ip4: yes
do-udp: yes
do-tcp: yes

# May be set to yes if you have IPv6 connectivity
do-ip6: no

# You want to leave this to no unless you have *native* IPv6. With 6to4 and
# Terredo tunnels your web browser should favor IPv4 for the same reasons
prefer-ip6: no

# Use this only when you downloaded the list of primary root servers!
# If you use the default dns-root-data package, unbound will find it automatically
#root-hints: "/var/lib/unbound/root.hints"

# Trust glue only if it is within the server's authority
harden-glue: yes

# Require DNSSEC data for trust-anchored zones, if such data is absent, the zone becomes BOGUS
harden-dnssec-stripped: yes

# Don't use Capitalization randomization as it known to cause DNSSEC issues sometimes
# see https://discourse.pi-hole.net/t/unbound-stubby-or-dnscrypt-proxy/9378 for further details
use-caps-for-id: no

# Reduce EDNS reassembly buffer size.
# IP fragmentation is unreliable on the Internet today, and can cause
# transmission failures when large DNS messages are sent via UDP. Even
# when fragmentation does work, it may not be secure; it is theoretically
# possible to spoof parts of a fragmented DNS message, without easy
# detection at the receiving end. Recently, there was an excellent study
# >>> Defragmenting DNS - Determining the optimal maximum UDP response size for DNS <<<
# by Axel Koolhaas, and Tjeerd Slokker (https://indico.dns-oarc.net/event/36/contributions/776/)
# in collaboration with NLnet Labs explored DNS using real world data from the
# the RIPE Atlas probes and the researchers suggested different values for
# IPv4 and IPv6 and in different scenarios. They advise that servers should
# be configured to limit DNS messages sent over UDP to a size that will not
# trigger fragmentation on typical network links. DNS servers can switch
# from UDP to TCP when a DNS response is too big to fit in this limited
# buffer size. This value has also been suggested in DNS Flag Day 2020.
edns-buffer-size: 1232

# Perform prefetching of close to expired message cache entries
# This only applies to domains that have been frequently queried
prefetch: yes

# One thread should be sufficient, can be increased on beefy machines. In reality for most users running on small networks or on a single machine, it should be unnecessary to seek performance enhancement by increasing num-threads above 1.
num-threads: 1

# Ensure kernel buffer is large enough to not lose messages in traffic spikes
so-rcvbuf: 1m

# Ensure privacy of local IP ranges
private-address: 192.168.0.0/16
private-address: 169.254.0.0/16
private-address: 172.16.0.0/12
private-address: 10.0.0.0/8
private-address: fd00::/8
private-address: fe80::/10
The configuration above is from the official Pi-hole website.
Save the file by pressing Ctrl + X, then Y, and Enter to confirm.
Start Unbound
Start the Unbound service with the following command:
sudo service unbound start
To ensure Unbound starts automatically on boot, run:
sudo systemctl enable unbound
Configure Pi-hole to Use Unbound
Now, we need to configure Pi-hole to use Unbound as its upstream DNS resolver.
- In the Pi-hole web interface, go to Settings -> DNS.
- Under Upstream DNS Servers, uncheck any pre-selected options like Google or Cloudflare.
- Scroll down to Custom 1 (IPv4) and enter:
127.0.0.1#5335 - Untick any other entry on ‘Upstream DNS Servers’
This tells Pi-hole to use Unbound running on the local machine for DNS resolution.
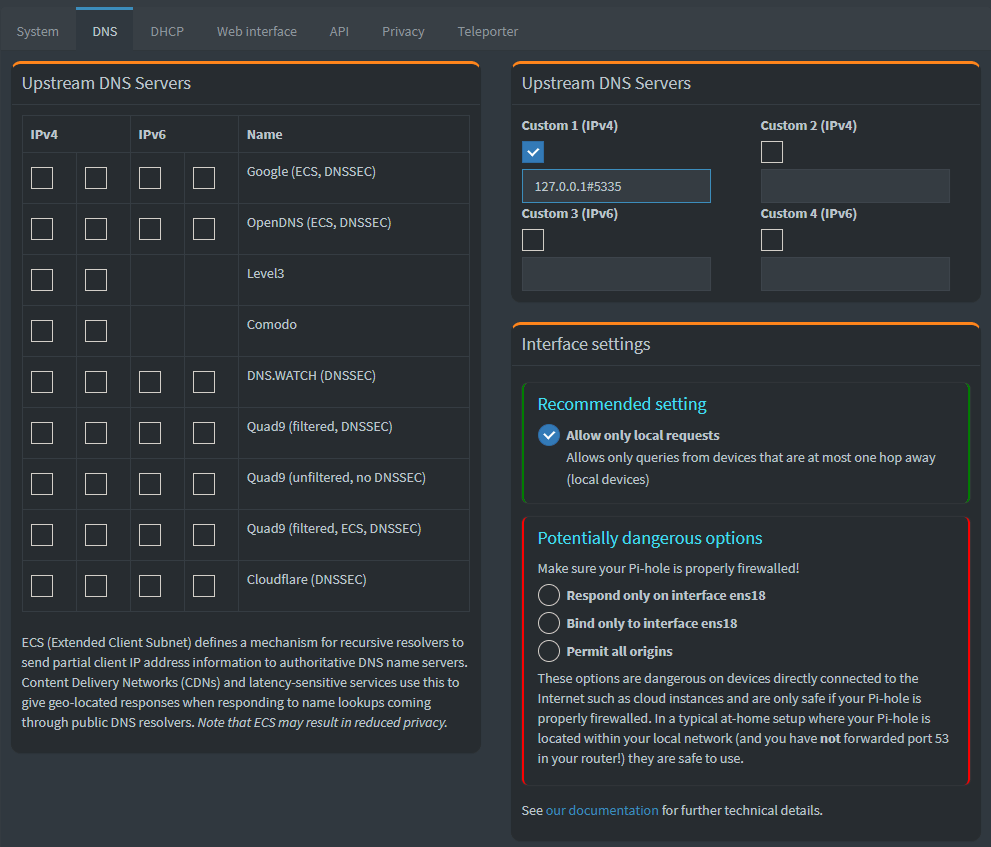
NB: Since DNSSEC is already enabled in Unbound, it’s unnecessary to enable it in Pi-hole’s GUI. If you choose to enable it, you may end up with redundant validation processes, which can cause increased logging and potential conflicts without offering any additional security benefits.
Test Your Recursive DNS Setup
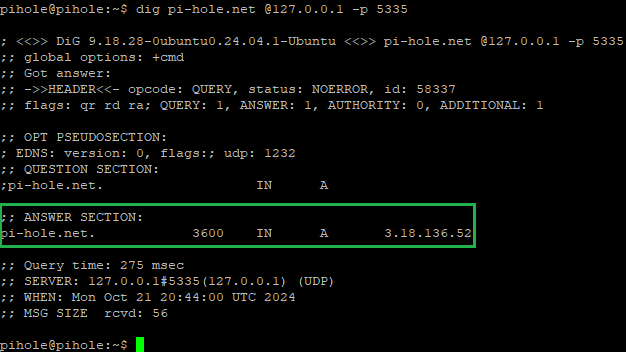
To test that everything is working, you can run the following command to verify that the name resolution goes through Unbound in PuTTY:
dig pi-hole.net @127.0.0.1 -p 5335
You should see a result showing that the query was resolved by Unbound.
Enjoy Full DNS Control
By setting up Unbound, you now have a fully recursive DNS server running locally, giving you more privacy, control, and independence from third-party DNS providers.
Also, when using e.g. IPLeak, your IP shows up as your DNS server. Cool, right?
Blocklists and whitelisting
This is where Pi-hole truly shines, but it will only start filtering after you add a few blocklists. These lists can contain various types of domains to block, including but not limited to:
- Pornographic sites
- Gambling sites
- Social media platforms
- Torrent sites
- Advertisement lists
- Tracker lists
- Malware sites
To add one or more lists, we can find them here:
When you find the ‘List‘-section, open notepad on your PC or Mac, then copy the ‘Original‘ link of what you want blocked into notepad.
When you have gathered a nice list, then we need to add it to pihole. In this example, I am using this list:
https://blocklistproject.github.io/Lists/abuse.txt
https://blocklistproject.github.io/Lists/ads.txt
https://blocklistproject.github.io/Lists/drugs.txt
https://blocklistproject.github.io/Lists/fraud.txt
https://blocklistproject.github.io/Lists/malware.txt
https://blocklistproject.github.io/Lists/phishing.txt
https://blocklistproject.github.io/Lists/piracy.txt
https://blocklistproject.github.io/Lists/ransomware.txt
https://blocklistproject.github.io/Lists/redirect.txt
https://blocklistproject.github.io/Lists/scam.txt
https://blocklistproject.github.io/Lists/tracking.txt
To add this list, copy the list with the spacing and navigate to ‘Pi-hole‘ -> ‘Adlists‘

Then click ‘Add’.
But, you are not done just yet, you need to navigate to ‘Diagnostics‘ -> ‘Upgrade Gravity’ -> ‘Update‘.
After clicking this, do not navigate away from the page, just sit back and relax.
When you see Success!, then you’re all set. Go back to the ‘Dashboard’, and the blocklist should now be updated. Ads should now be blocked on most websites. However, please note that you may still need to do some tinkering for specific applications or websites that continue to show ads. You can manually block or whitelist domains by visiting the ‘Query Log’ or the ‘Domains’ tab, where you can choose to either blacklist or whitelist a domain manually.
Remember:
Pi-hole and other DNS blocking utilities are not something you can “set and forget.” It takes some effort to fine-tune it to your liking. Some websites or devices may not work as expected due to blocking, but you’ll need to tinker with Pi-hole to fix these issues. Domains change frequently, so you’ll have to invest some time to keep it functioning as you want.
Congratulations—now you have a network-wide ad blocker (or per device) and more control over your devices!
Further Configuration (Optional)
These steps are completely optional.
1.) For better integration between Proxmox and your virtual machines (VMs), it is recommended to enable the QEMU Guest Agent. You can install the agent using the following command:
sudo apt-get install qemu-guest-agent && sudo service qemu-guest-agent start
Press ‘Y’ and then click ‘enter’.
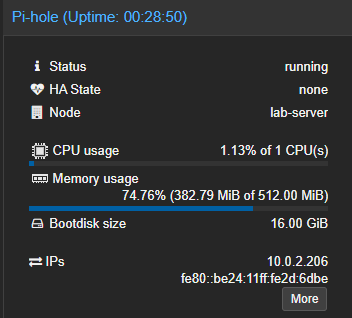
After this, you’ll see more information about the VM in Proxmox:
- Correct CPU usage
- Correct RAM usage
- IP address of the VM
2.) Firewalls are an important security measure in networks. Even if your network is tightly secured with a firewall, your VMs should also have their own firewalls. You can never be too careful.
Installation of UFW:
- Use the command
sudo ufw allow 22/tcp && sudo ufw allow 80/tcp && sudo ufw allow 53/tcp && sudo ufw allow 53/udp
After this command, the following ports are allowed to communicate:
- 22 (TCP) – SSH
- 53 (TCP/UDP) – DNS queries
- 80 (TCP) – HTTP Pi-hole GUI
If you need more services, you can consider opening these to in UFW:
- 443 (TCP) – HTTPS
- 67 (UDP) – Pi-hole DHCP server
- 853 (TCP) – DNS over TLS
After allowing these ports, we will enable the UFW and log its entries using the following command:
sudo ufw enable && sudo ufw logging on
Troubleshooting
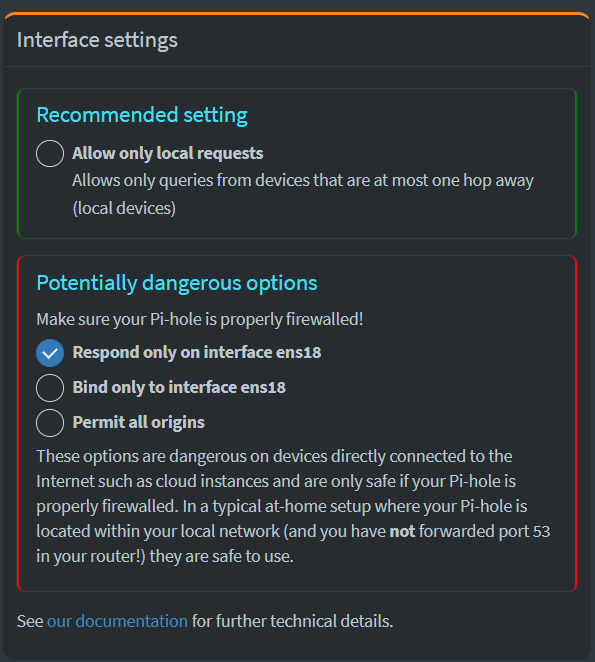
I’ve only encountered one problem with Pi-hole’s default configuration, that is that it is not resolving domains. This may be due to your network setup.
If you are like me and have multiple VLANs you may not get Pi-hole working out-of-the-box. I had to change this setting for it to work.
Go to Pi-hole -> ‘Settings’ -> ‘DNS‘ and change this until it works for you:
That’s all!
Thank you so much for reading, and congratulations on hosting your own recursive, ad-blocking DNS server. If you enjoyed this post, feel free to check out my other articles.

