10 Essential Steps to Securely Host Your Website From Home
10 Steps to Securely Host your Website from Home with Webmin and Cloudflare almost for free!
Introduction

In this guide, we’ll explore how to securely host your website from home using Webmin on Ubuntu Server 24.04, while enhancing its protection with Cloudflare. By following these steps, you’ll gain access to a free CDN, basic anti-DDoS protection, and additional security features to safeguard both your web server and home network.
Before diving into the guide, it’s highly recommended to review the pros and cons of hosting a website from home. While there are plenty of advantages, there are also significant challenges and risks you should consider.
For this setup, I’ll be using pfSense as my firewall, but the process will be very similar for other firewall configurations.
This guide is intended for advanced and expert users. However, if you’re an intermediate user, you might still pick up a thing or two along the way!
What We’ll Cover in This Tutorial
1. Essential Knowledge for Self-Hosting
- Learn the basics of routers, firewalls, VLANs, and server management.
- Understand why static IPs and network segmentation are critical for security.
2. Preparing Your Hardware and Network
- Choose suitable hardware: Raspberry Pi, mini-PC, old desktop, or virtual machine.
- Set up a dedicated VLAN to isolate your server for security.
- Assign a static IP to ensure consistent connectivity and simplify configurations.
3. Installing and Securing Ubuntu Server
- Install Ubuntu Server 24.04 and configure a static IP.
- Secure your server with updates, a firewall (UFW), and tools like Fail2Ban.
- Optionally, change the default SSH port for enhanced protection.
4. Installing Webmin for Server Management
- Install and configure Webmin for a user-friendly interface.
- Update Webmin packages and enable dark mode for better usability.
5. Registering a Custom Domain and Setting Up Cloudflare
- Purchase a domain name through Namecheap or another provider.
- Configure Cloudflare’s DNS servers to enhance security and performance.
- Secure your domain with Cloudflare’s SSL/TLS encryption (Full or Full (Strict)).
6. Configuring Dynamic DNS (DDNS)
- Set up DDNS in pfSense to keep your domain updated with your public IP changes.
- Use Cloudflare’s API to automate DNS record updates.
7. Configuring Apache Web Server in Webmin
- Install Apache and create virtual hosts for your domain.
- Enable SSL with Cloudflare’s Origin Certificates for secure HTTPS connections.
8. Setting Up Port Forwarding and Firewall Rules
- Create aliases in pfSense for Cloudflare’s IP ranges and required ports.
- Configure NAT port forwarding to allow only Cloudflare traffic to your server.
- Restrict direct access to your server’s public IP.
9. Testing and Going Live
- Verify that your site is accessible through Cloudflare while blocking all other access.
- Test your HTTPS setup and troubleshoot common issues like redirect loops.
10. Maintaining Security and Performance
- Regularly update your server and review firewall rules.
- Monitor your site’s performance and optimize Cloudflare’s caching settings.
Ready to roll up your sleeves? Self-hosting your own website from home is a bit of an adventure, but don’t worry—I’ve got you covered every step of the way. From setting up hardware to securing your site like a pro, we’ll tackle it all. Grab a coffee (or your favorite drink), and let’s get this show on the road!
Knowledge Before Hosting Your Own Website From Home

Before even considering hosting your own website, it’s important to have some basic technical knowledge. While you don’t need to be an expert, understanding the following topics will make the process much smoother and more secure:
Routers
- Key Skills:
- Setting up a static IP address in your router’s DHCP server.
- Understanding how to configure your router to assign a permanent IP to your server for stability.
- Why It’s Important:
A static IP ensures your port forwarding rules and DNS configurations remain consistent, avoiding downtime or connectivity issues.
Firewalls
- Key Skills:
- Opening specific ports needed for web traffic (e.g., port 80 for HTTP, port 443 for HTTPS).
- Port Forwarding: Routing external traffic to your local server securely.
- Why It’s Important:
Misconfigured firewalls can leave your server or entire network vulnerable to attacks, or they can block legitimate traffic, resulting in your website becoming inaccessible.
VLANs
- Key Skills:
- Setting up a VLAN (Virtual Local Area Network) for DMZ (Demilitarized Zone) devices.
- Restricting access between VLANs to isolate your server from other devices on your network.
- Why It’s Important:
VLANs provide an additional layer of security by segmenting your home network. If your server is compromised, the attacker won’t have direct access to your personal devices like PCs or smart home systems.
Basic Networking (Optional but helpful)
- Key Skills:
- Understanding IP addresses (private vs. public), subnet masks, and gateways.
- Knowing how DNS works and how it resolves your domain to your server’s IP.
- Why It’s Important:
Basic networking knowledge helps you troubleshoot common issues, such as why your website might not be accessible externally.
Server Management (Optional but recommended)
- Key Skills:
- Basic Linux command-line skills (e.g., file management, system updates).
- Installing and managing web servers like Apache or Nginx.
- Why It’s Important:
Most self-hosted setups use Linux-based servers, so knowing how to navigate and manage the system is invaluable.
Final Note
If some of these concepts feel overwhelming, don’t worry! There are plenty of beginner-friendly tutorials and guides available to help you learn. Start small, practice with a test environment, and build your knowledge as you go. Following this guide to Securely Host your website From Home is a fantastic learning opportunity!

Step 1: Prepare Your Server Hardware and Network
Before diving into the setup, it’s crucial to properly prepare your server hardware and network. This ensures your hosting environment is secure, efficient, and scalable.
Set Up a Dedicated VLAN for Your Server
As mentioned earlier, any service that you plan to expose to external access (like hosting a website) should be isolated on a dedicated and secure VLAN.
Why It’s Important:
- Prevents attackers from gaining access to your other devices if the server is compromised.
- Improves network management and segmentation for better security.
How to Do It:
- Configure a VLAN on your router or managed switch.
- Assign your server to this VLAN and ensure it’s isolated from your main network.
- Use firewall rules to strictly control traffic between the VLAN and the rest of your network.
Use a VPN for Internal Access
While hosting a website externally is the goal, it’s often best to access sensitive internal resources (like your admin panel or internal articles) through a VPN connection to your home network.
Why It’s Important:
- Keeps internal services secure by restricting access to trusted devices.
- Reduces the attack surface by not exposing sensitive admin tools or content directly to the internet.
How to Do It:
- Set up a VPN server (e.g., WireGuard, OpenVPN) on your router or a dedicated device.
- Configure your devices to connect to your home network securely via VPN.
Ensure Your Server Hardware is Ready
Choose Your Hardware:
- Use a dedicated server, an old PC, or a virtual machine (like Proxmox) depending on your needs and resources.
Upgrade Where Necessary:
- Ensure sufficient CPU and RAM for the expected load.
- Use an SSD for fast read/write speeds and better performance.
Test Stability:
- Run a quick stress test or disk check to ensure the hardware is stable for 24/7 operation.
Configure a Static IP for Your Server
- Assign a static IP to your server within your VLAN using your router’s DHCP server.
- This will ensure that port forwarding and other configurations don’t break due to IP changes.
Plan for Power and Cooling
- Power Backup: Consider a UPS (Uninterruptible Power Supply) to keep your server running during power outages.
- Cooling: Ensure proper airflow and cooling for stable operation, especially if using compact hardware like a Raspberry Pi or mini-PC.
Step 2: Install Ubuntu Server (or Your Preferred OS) and setting a static IP
In this guide, we’ll be using Ubuntu Server 24.04 as our operating system. It’s lightweight, stable, and widely supported for hosting purposes. We’ll install this on a Proxmox VM, following a detailed setup process.
If you’re unfamiliar with installing operating systems in Proxmox, you can refer to a guide I created earlier specifically for setting up virtual machines in Proxmox. This will walk you through the steps to get Ubuntu Server up and running efficiently.
Easy Guide on Installing Ubuntu Server 24.04 on Proxmox
Setting a Static IP Address for Your Server: Why It’s Crucial
When hosting a website or any service from home, assigning a static IP address to your server is essential. Here’s why:
Firewall Rules:
- Your firewall rules need to ensure that incoming traffic is directed to the correct device—your server. If your server’s IP address changes dynamically (via DHCP), the rules may end up directing traffic to the wrong device, which can lead to security risks or service failures.
Network Security:
- A static IP prevents other devices on your network from accidentally being exposed to external traffic. This is critical for maintaining the integrity and safety of your network.
Proper Traffic Management:
- Static IP addresses are necessary for port forwarding and ensuring that requests reach the correct device without delays or misdirection.
VLANs for Traffic Segmentation:
- Implementing VLANs (Virtual Local Area Networks) helps separate your server’s traffic from other devices, like personal computers or IoT devices. This segmentation improves security and ensures that only necessary traffic flows between network segments.
How to Set a Static IP Address in pfSense
- Log in to pfSense:
- Access your pfSense web interface by entering its IP address in your browser.
- Navigate to DHCP Server:
- Go to Services > DHCP Server.
- Select the Appropriate Interface:
- Choose the network interface your server is connected to (e.g., LAN).
- Create a Static Mapping:
- Scroll down to the “DHCP Static Mappings for this Interface” section.
- Click “Add” to create a new mapping.
- Enter the Server Details:
- MAC Address: Enter the MAC address of your server (find this in the server’s network settings or through DHCP leases in pfSense).
- IP Address: Assign an unused IP address within your LAN’s subnet (e.g.,
192.168.1.100). - Hostname: Enter a recognizable name for the server (e.g.,
webserver).
- Save and Apply Changes:
- Click “Save” and then “Apply Changes” to finalize the configuration.
- Update Your Server’s Network Settings:
- Ensure the server is set to use DHCP so it receives the static assignment automatically.
Testing the Setup
- Ping the static IP from another device on your network to ensure connectivity.
- Verify that your firewall rules are correctly configured to forward traffic to the new static IP address.
By setting a static IP and leveraging VLANs, you’ll create a secure and efficient network environment for hosting your website and managing external traffic. This is a critical step in ensuring that your server operates reliably and your network stays safe from unintended exposure.
What’s Next?
After successfully installing Ubuntu Server and reserving an IP Address, the next step is to set it up and configure it for hosting.
Step 3: Update and Secure Your Server
Start by ensuring your server is running the latest packages
NOTE: In SSH clients, such as PuTTY, you can copy text simply by selecting it with your mouse. To paste text, just right-click in the terminal window. This can save time when entering long commands!
Log in to your server and run the following command
sudo apt-get update && sudo apt-get upgrade -y
Explanation of the Command
sudo apt-get update: Updates the list of available packages and their versions from the configured repositories.&&: Ensures that the next command runs only if the first one is successful.sudo apt-get upgrade -y: Upgrades all installed packages to their latest versions. The-yflag automatically answers “yes” to prompts during the upgrade process.
Additional Recommendations for Security
Install Unattended Upgrades: To keep your server automatically updated with the latest security patches:
Enable Automatic Updates
Run the following to configure unattended upgrades:
sudo dpkg-reconfigure --priority=low unattended-upgrades
Press ‘Enter‘ for ‘Yes‘.
Configure the Firewall: Enable and configure the firewall using UFW:
sudo ufw allow sshYou will be prompted after enabling UFW that it may disrupt existing SSH connections, proceed with ‘Y’.
sudo apt-get install fail2ban -y
Basic Configuration
Fail2Ban works out of the box with default settings, but you can customize it for better protection:
Create a Local Configuration File: Instead of editing the main configuration file (/etc/fail2ban/jail.conf), create a local override file:
Edit the Local Configuration: Open the file for editing:
In this file: Scroll down a bit using your arrow keys, and you’ll find the following lines, which you can configure to suit your needs. But we will use the search function:
To search within Nano:
- Press CTRL+W and type the term you’re looking for, e.g.,
"bantime ="(note the two spaces before the=). - Press Enter to find the first match.
- To find the next match, press CTRL+W again, leave the search field empty, and press Enter to continue searching.
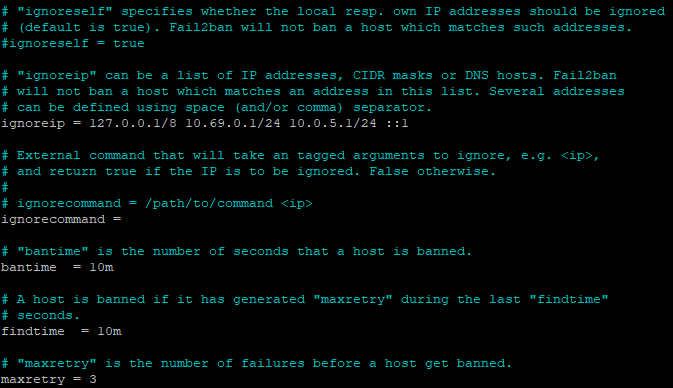
- Ignore Specific IPs: To prevent trusted IPs from being banned, you can add them to the ignore list. For example:
Please Note: You must use the numbers located above the letter keys on your keyboard, not the numeric keypad on the side.
- Ban Time (How long an IP is banned): Adjust the
bantimeto suit your needs. By default this is set to 10 minutes: - Max Retries (Number of failed attempts before banning): Set how many failed login attempts are allowed before banning:
Enable the SSH Jail
Fail2Ban comes with predefined “jails” for protecting services like SSH. To enable the SSH jail:
- In the
jail.localfile, find the[sshd]section and ensure it looks like this:- Adjust the port to
2222now (it is currently ‘ssh‘), as we will configure the SSH service to use this port later. If you prefer to keep using the default SSH port (22), you can skip this step—but using2222is recommended for enhanced security. - Ensure the line
enabled = trueis present to activate the jail. If not, then add it directly under ‘port = 2222‘. - The
logpathspecifies the log file where SSH login attempts are recorded.
- Adjust the port to
- When finished: Press
CTRL+X, typeYto confirm, and then pressEnterto save the file.
Restart Fail2Ban
After making changes, restart the Fail2Ban service:
Monitor Fail2Ban
You can check which IPs have been banned and monitor activity:
- View Banned IPs:
- Unban an IP (if needed):
Final Check
Verify that Fail2Ban is running and protecting your server:
Change SSH port (Optional)
While not strictly necessary, changing the default port (e.g., to 2222) can reduce the number of automated attacks:
Edit the SSH configuration file:
Change the port:
Find the line that says #Port 22, uncomment it, and update it to: Port 2222
Edit the SSH Socket configuration file:
sudo nano /lib/systemd/system/ssh.socket
Find the line that says ListenStream=22, and update it to: ListenStream=2222
Click ‘CTRL-X‘, then ‘Y‘
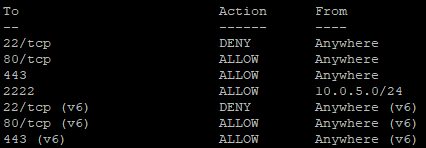
Update the firewall rule for the new port:
If your server requires SSH access from multiple subnets, add a rule for each subnet. Here’s how:
After updating Webmin, you’re ready to move on to the next step: setting up your domain and DNS. This will ensure your site is accessible and properly configured for the web. Let’s get started!
Free domains and the current situation
Unfortunately, free domains are becoming increasingly difficult to find. However, subdomains might still be a good fit for your needs.
Freenom, a service known for providing free domain names with TLD’s such as .tk, .ml, .ga, .cf, and .gq, has recently faced significant legal challenges.
In March 2023, Meta (formerly Facebook) filed a lawsuit against Freenom, accusing the company of cybersquatting and trademark violations. Meta alleged that Freenom ignored abuse reports related to phishing websites and profited from traffic directed to these malicious domains.
As a result of the lawsuit, Freenom halted new domain registrations in March 2023. By February 2024, Freenom announced a settlement with Meta and revealed their decision to exit the domain registration business entirely.
This has made it nearly impossible to register free domains with TLD’s like .tk, .ml, .ga, .cf, and .gq through Freenom.
If you’re still searching for free options, subdomains remain a viable alternative. They can be a practical solution for personal projects or testing environments.
How to Buy and Why It’s Awesome to Own a Custom Domain Name
Registering a free Cloudflare account
Once you’ve registered at Namecheap and purchased your domain, the next step is to create a free account at Cloudflare. This will allow you to manage your DNS settings and enhance your domain’s performance and security. For this guide, we’ll use Cloudflare’s Free Plan, which offers several key features that are perfect for our project:
- Fast, Easy-to-use DNS (Fast responsive times globally and near-instant updates.)
- Unmetered DDoS Protection (Cloudflare DDoS protection secures websites and applications while ensuring the performance of legitimate traffic is not compromised.
- CDN (Our 330 data centers located across the globe provide visitors with location-based access to your website, while removing latency and improving performance.)
- Universal SSL Certificate (Cloudflare is compatible with your existing SSL configuration. If you do not currently use SSL, Cloudflare can provide you with SSL capabilities — no configuration required.)
- Free Managed Ruleset (Free Cloudflare-managed ruleset protecting against highest severity vulnerabilities.)
- Web Application Firewall (Cloudflare Web Application Firewall’s intuitive dashboard enables users to build powerful rules through easy clicks and also provides Terraform integration. Every request to the WAF is inspected against the rule engine and the threat intelligence curated from protecting millions of websites. Suspicious requests can be blocked, challenged or logged as per the needs of the user while legitimate requests are routed to the destination, agnostic of whether it lives on-premise or in the cloud.)
The information above is sourced directly from Cloudflare’s website. With these features, Cloudflare’s Free Plan is more than sufficient to meet the needs of this project while offering robust performance and security enhancements.
To sign up for Cloudflare’s Free Plan, click here.
Once you’ve registered, the next step is to add your domain. Simply type in your domain name in the format below:
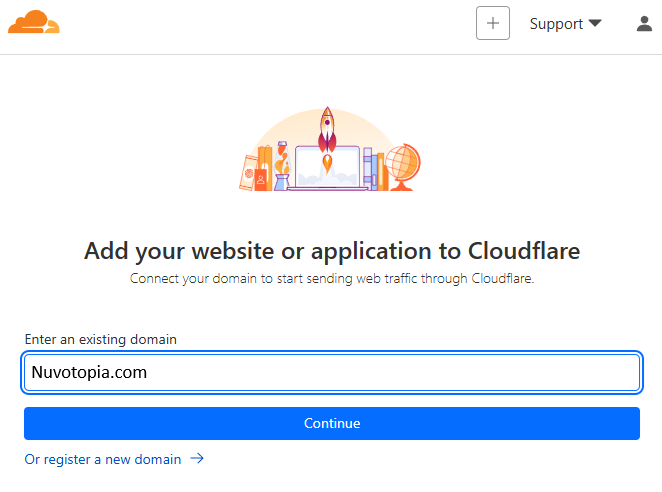
Make sure to type your domain name exactly as registered (e.g., nuvotopia.com), without adding “www.” Cloudflare will handle subdomains like “www” separately during setup.
On the next page: Select the ‘Free’ plan and press ‘Continue’ to proceed with the setup. The Free plan includes all the essential features we need for security and performance optimization.
Once done, Cloudflare will guide you through verifying ownership and configuring DNS settings.
Note: Check your email for any verification emails from Cloudflare. Also, it’s recommended to enable two-factor authentication to protect your Cloudflare account. You can enable this under ‘My Account’.
Step 7: Setting Up Domain and Configuring DDNS and Cloudflare for Protection
Now that you’ve registered a custom domain name with Namecheap, we will now go through the steps to:
- Setup Cloudflare’s DNS Servers on your Custom Domain
- Configure SSL/TLS for your domain
- Setup DDNS with pfSense and Cloudflare
- Setup DNS
But first things first: Do not attempt to visit your new domain in a browser yet. In this step, we’ll be changing the DNS servers for your domain in Namecheap, and it’s important to understand that these changes take time to propagate. Local DNS servers (like those used by your ISP) and global DNS servers need time to synchronize the new settings. This process, known as DNS propagation, can take anywhere from a few minutes to several hours. So, hold off on testing the domain until the changes have fully propagated to avoid confusion or errors.
Use Custom DNS Servers on your custom domain
To simplify the setup, we’ll be using Cloudflare’s DNS servers exclusively. Follow these steps to configure your domain with Cloudflare:
- Log in to Cloudflare:
- Click on the Cloudflare logo in the top left corner of the dashboard.
- Navigate to the ‘Websites’ section and select your domain name.
- Locate Cloudflare Nameservers:
- Once you’re on the domain’s overview page, scroll down to Step 3 in the setup instructions.
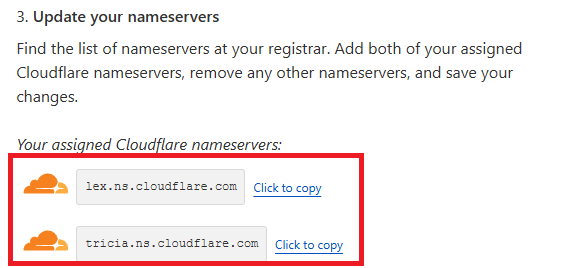
- Take note of the nameservers listed by Cloudflare (e.g.,
ns1.cloudflare.comandns2.cloudflare.com), as we’ll need these shortly.
Cloudflare’s assigned nameservers, as shown in the dashboard. Copy these and update the DNS settings in your domain registrar (e.g., Namecheap) under Custom DNS.
- Update DNS Servers in Namecheap:
- Log in to your Namecheap account and go to ‘Domain List‘.
- Click on ‘Manage‘ on your custom domain
- (If it says Verify Contacts, check your email and verify your email address)
- Select Custom DNS as the nameserver option.
- Enter the Cloudflare nameservers you noted earlier.

Choose ‘Custom DNS‘, fill in your DNS Servers from Cloudflare and press ‘Save‘
- Save Your Changes:
- Click Save and allow some time for DNS propagation to complete. This process can take several hours, so be patient.
By using Cloudflare’s DNS servers, you’ll gain access to their robust features, such as enhanced security, faster performance, and free SSL. Once the DNS changes propagate, your domain will be fully managed by Cloudflare, ready for the next steps!
This step ensures that your domain is properly linked to Cloudflare’s DNS Servers as we’ll set up DDNS for your server, even if your public IP address changes, and benefits from Cloudflare’s robust performance and security features.
pfSense DDNS setup
As mentioned earlier, I’m using pfSense as my firewall, which supports Dynamic DNS (DDNS). This feature is ideal for my project because it automates updating DNS records when my public IP address changes. Most modern routers also support DDNS, making it a useful solution to avoid manually updating DNS settings in Cloudflare whenever my ISP assigns a new IP address due to network changes or power outages.
Why Use DDNS with pfSense?
- Automatic Updates: Keeps your domain pointing to the correct IP without manual intervention.
- ISP-Friendly: Handles dynamic IP changes from your ISP seamlessly.
- Cloudflare Integration: Works with Cloudflare to update DNS records in real time.
Before Configuring DDNS in pfSense
How to Add an A Record in Cloudflare
- Log in to Cloudflare:
- Visit Cloudflare and log in to your account.
- Go to Your DNS Settings:
- Select your domain from the dashboard.
- Navigate to the DNS tab.
- Add a New A Record:
- Click “Add Record” at the top of the DNS page.
- Configure the A Record:
- Type: Select A from the dropdown.
- Name: Enter the hostname for your web server (e.g.,
homeforhome.nuvotopia.comor@for the root domain). - IPv4 Address: Enter Your Current Public IP Address. This will later be updated dynamically by pfSense.
- Proxy Status: Choose Proxied (orange cloud) to route traffic through Cloudflare.
- Save the Record:
- Click “Save” to create the A Record.
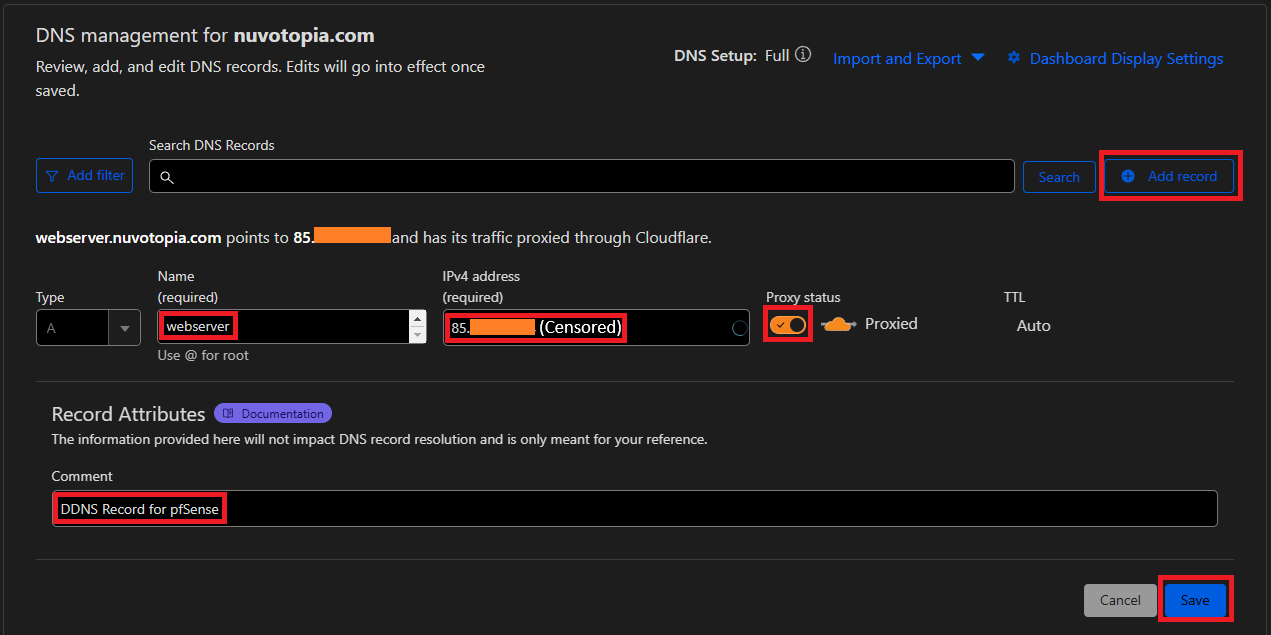
Add a new A-type Record in Cloudflare like this
We will need to add this ‘A Record’ in Cloudflare under your DNS settings before moving on to setting up your DDNS Client in pfSense or any other system.
How to Configure DDNS in pfSense
- Log in to pfSense:
- Access the pfSense web interface by entering its IP address in your browser.
- Navigate to DDNS Settings:
- Go to Services > Dynamic DNS.
- Add a New DDNS Entry:
- Click Add to configure a new DDNS service.
- Choose Cloudflare:
- Select Cloudflare from the list of supported DDNS providers.
- Enter Your Credentials and Domain Info:
- Have two tabs open in your Web Browser: Keep both your router’s configuration page and Cloudflare’s dashboard open in separate tabs. This will make it easier to switch between them as you set up and test the Dynamic DNS configuration. It’s a small step that saves time and minimizes confusion during the setup process.
- Disable: Leave unticked.
- Service Type: Cloudflare.
- Interface to monitor: WAN.
- Hostname: Enter the domain or subdomain where you want your web server to be accessible (e.g.,
webserver.nuvotopia.com), or use@to point the root domain directly to your web server. - Cloudflare Proxy: Enable Proxy (Enable this option to route your traffic through Cloudflare’s servers. This hides your public IP address, providing an additional layer of privacy and security while also filtering traffic to protect against malicious activities like DDoS attacks. Enabling the proxy also ensures your domain benefits from Cloudflare’s caching and performance optimization features).
- Verbose logging: Off (Leave this off unless these settings don’t work). Enabling verbose logging generates detailed logs, which are useful for troubleshooting, but it can clutter your logs and use extra system resources during normal operation. Keep it off unless you’re diagnosing an issue with your DDNS setup.
- Username: Use your Zone ID (You can find your Zone ID by scrolling down on your domain’s Overview page in Cloudflare. This ID uniquely identifies your domain in Cloudflare’s system and is required for proper communication between pfSense and Cloudflare).
- Password: Use your API Token.
How to Get Your Cloudflare API Token- Log in to Cloudflare:
- Visit Cloudflare and log in to your account.
- Access API Tokens:
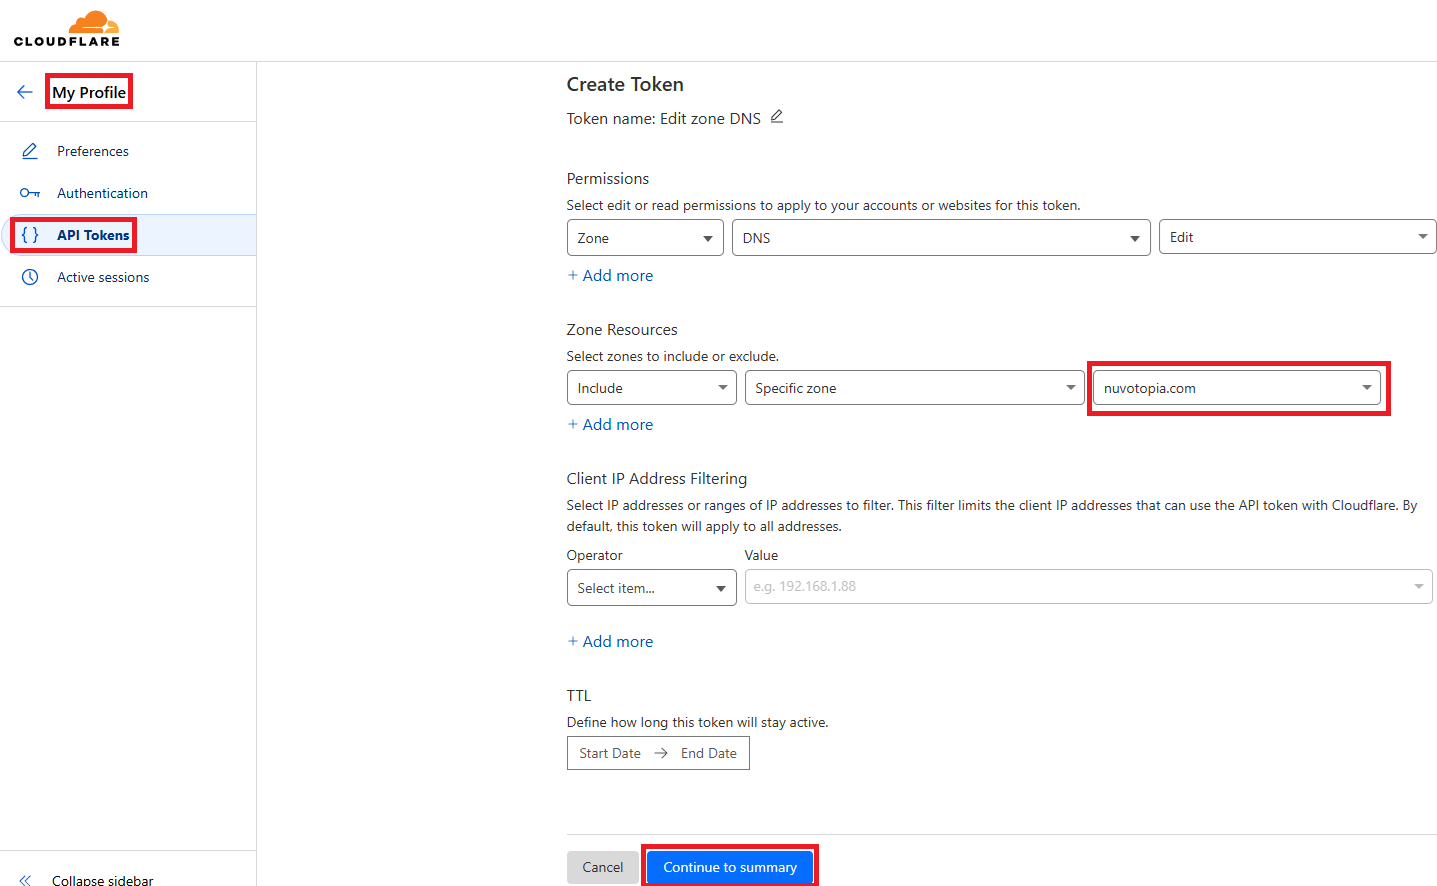
- Click your profile icon in the top-right corner and select “My Profile”. (Tip: You can also switch to dark mode here). Also, before continuing, you should enable ‘Two-Factor Authentication‘ under ‘Authentication‘.
- Go to the “API Tokens” tab.
- Create a New API Token:
- Click “Create Token” and choose the “Edit zone DNS” template.
- Set Permissions:
- Under Permissions, ensure Zone is set to DNS – Edit.
- Under Zone Resources, select “Include”, then “Specific Zone”, and choose your domain (e.g.,
nuvotopia.com). This ensures the token is restricted to managing DNS settings for this specific domain only.
- Generate the Token:
- Review the settings carefully, click “Create Token”, and copy the token immediately.
- Save the Token:
- Store the token securely, such as in a password manager, as it won’t be shown again.

Creating a Token in Cloudflare
You can now use this API Token in pfSense for your DDNS setup! This token ensures secure and restricted access for managing your DNS records.
- Log in to Cloudflare:
- Back to pfSense or your router: Fill in your API Token.
- TTL: 1800 (This equals 30 minutes). This duration strikes a perfect balance between efficient updates and reduced DNS query load, making it ideal for most setups, including DDNS configurations.
- Description:e.g., “MyWebsite.com” (This is only for administrative purposes and helps you identify this specific DNS record setup in the future.)
- Click Save: Save your settings.
- After Saving: You’ll be redirected to your Dynamic DNS Clients page. Wait patiently, but feel free to refresh the page to check if your DNS updates successfully within the next 15 minutes. Take a short break—you’ve earned it—but don’t go too far, as we’re not done yet!
- If after a while, this doesn’t work: Click on ‘Edit’ next to your new Dynamic DNS entry. Scroll all the way down and click ‘Save & Force Update’ to manually trigger the DNS update. This can help resolve issues if the automatic update fails for any reason.
- If it’s green:You should see a green check mark under Status, and the Cached IP should match your correct public IP address. This indicates that the Dynamic DNS update is working as expected.

DDNS is working correctly in pfSense - To verify Cloudflare is working:
Try pinging your domain (e.g.,webserver.nuvotopia.com). If Cloudflare is correctly proxying your traffic, the ping will return a different IP address than your original public IP. This is because Cloudflare hides your real IP for security.
Hurray! Everything is now set up and working!

Benefits of Using DDNS in pfSense or any other system
- Eliminates the hassle of manually updating DNS records.
- Ensures your domain stays live and connected to your home server, even after an IP change.
- Provides a reliable and automated solution for home-hosted projects.
With this setup, your domain will always stay up-to-date with your home’s dynamic IP, allowing you to focus on building and experimenting without interruptions.
Installing Apache Web Server in Webmin
There are many types of web servers available for hosting your website, each with its own strengths and features. In this tutorial, however, we will focus on installing and configuring Apache Web Server, one of the most widely used and versatile web servers. Let’s get started!
How to Install Apache Web Server in Webmin
Follow these steps to install and configure Apache Web Server via Webmin:
Log in to Webmin
- Access Webmin by navigating to your server’s IP address or hostname in your web browser (e.g.,
https://your-server-ip:10000). - Enter your Webmin username and password to log in.
Navigate to Apache Web Server Module
- Once logged in, go to the “Un-used Modules” section on the left-hand sidebar.
- Look for the “Apache Webserver” module. Press ‘Install Now‘, and then again ‘Install Now‘.
- When it’s done installing, click on ‘Return to Apache Webserver‘
Configure Apache
Step-by-Step: Create a Virtual Host
- Go to “Create Virtual Host”
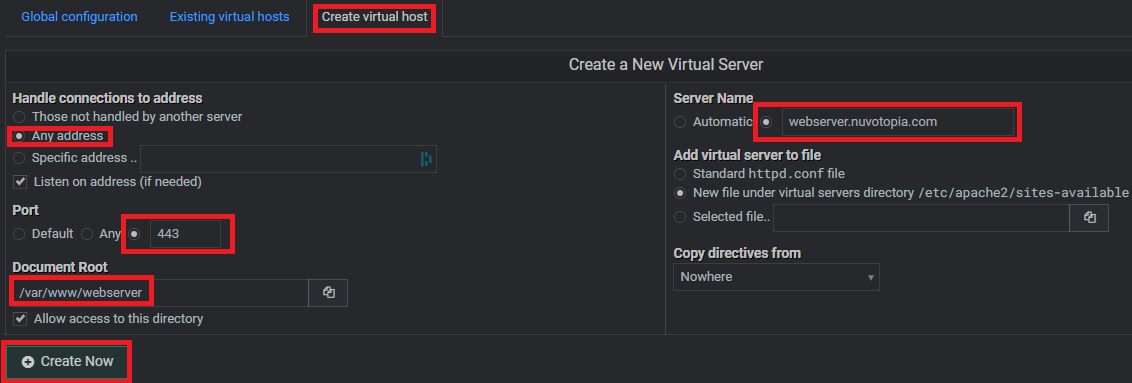
In the Apache Webserver module, click on “Create virtual host.” - Fill in the Details for the Website:
- Handle connections to address: Select Any address.
- Port: Use 443 for HTTPS (recommended for security) or 80 if you want HTTP (not recommended).
- Document Root: Enter the folder where the website files are stored, e.g.,
/var/www/webserver. - Server Name: Enter the domain or subdomain, e.g.,
webserver.nuvotopia.com. - Add virtual server to file: Choose New file under virtual servers directory for better organization.
- Click “Create Now”
Apache will create the configuration for this website.
Create a new Host by following this guide
For Additional Websites or Subdomains
Repeat the steps above for each additional website or subdomain. For example:
- For
shop.nuvotopia.com, use/var/www/shopas the Document Root. - For
webserver.nuvotopia.com, use/var/www/webserveras the Document Root.
Before these domains will work, you’ll need to repeat the DDNS setup for each additional website or subdomain, such as blog.yourdomain.com or shop.yourdomain.com. In this guide, we’re only focusing on webserver.nuvotopia.com.
Important: This won’t work yet because firewall rules are not set up. We’ll handle that as the final step to ensure secure traffic routing.
Enabling SSL for your domain
Using Cloudflare for SSL, securing your website is straightforward. Here’s how you can set it up in Webmin’s Apache module:
Enable SSL in Apache
- Go to the Apache Webserver module in Webmin.
- Click “Global Configuration” and then “Configure Apache Modules.”
- Tick the ‘SSL‘ Module on.
Add Cloudflare SSL Certificate
- Log in to your Cloudflare dashboard and go to your domain.
- Navigate to “SSL/TLS” and ensure SSL is set to Full or Full (Strict) (depending on your certificate setup).
- Use Cloudflare’s Origin Server Certificates:
- In the SSL/TLS section, go to “Origin Server” and click “Create Certificate.”
- Generate private key and CSR with Cloudflare: Private key type: RSA (2048)
- Hostnames: Use
*.yourdomain.comandyourdomain.com– this covers all subdomains likeshop.yourdomain.comorblog.yourdomain.com, but not deeper ones likeforum.blog.yourdomain.com. If you need those, you must add them separately. - Certificate Validity: 15 years.
- Create Certificate: Click Create, then copy the certificate and private key into a Notepad file or keep this tab open, as you’ll need them to add to Webmin.
- Back in Webmin:
- Add the certificates into webmin by following these steps:
- In Webmin open Terminal. Tools -> Terminal. Or you can use PuTTY or another SSH Client.
- Create a folder to store the certificates: Write:
sudo mkdir -p /etc/webmin/ssl/ - Create a ‘origin_certificate file’: Write:
sudo nano /etc/webmin/ssl/origin_certificate.crtPress Enter, and when prompted, enter your admin password (the same one you use to log in to the Webmin interface). Then paste the contents of your Cloudflare Origin Certificate into the file using right click and paste (this took a little while for me). Once done: Press ‘CTRL+X’, then ‘Y’, then Enter - Create a ‘origin_private.key’: Write:
sudo nano /etc/webmin/ssl/origin_private.keyPress Enter, Then paste the contents of your Cloudflare Private Key into the file using right click and paste (this took a little while for me). Once done: Press ‘CTRL+X’, then ‘Y’, then Enter - The Certificates are now saved and we can apply them.
- Go back to ‘Un-used Modules‘ -> ‘Apache Webserver‘
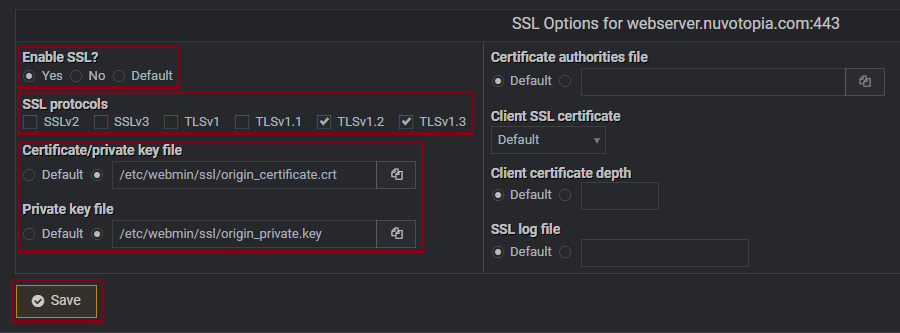
- Under “Edit Virtual Server” (Choose your newly created server), click on ‘SSL Options‘.
- Apply the certificates like this, and make sure to disable old SSL/TLS protocols:

Enable SSL like shown in this picture. The settings here are very important.
- Add the certificates into webmin by following these steps:
- To enable SSL on your other virtual hosts within the same domain, e.g., shop.mywebsite.com, forum.mywebsite.com, etc., follow the SSL steps above and use the same certificate and private key files.
- When done: Click ‘Apply Changes‘ in the top right corner.
Key Notes When Using Cloudflare SSL
- Ensure your Cloudflare SSL/TLS settings are set to Full or Full (Strict) for end-to-end encryption.
- Cloudflare will proxy requests, meaning visitors won’t see your server’s IP but instead see Cloudflare’s IP addresses.
- If you use Cloudflare’s Free SSL, you don’t need to manually renew it since Cloudflare handles this for you.
Changing the SSL/TLS Encryption Mode
To ensure your site is fully secured with end-to-end encryption, follow these steps to change the SSL/TLS encryption mode in Cloudflare:
1. Access the SSL/TLS Settings:
- Go to your domain in Cloudflare.
- Navigate to SSL/TLS → Overview.
- On the right side of SSL/TLS encryption, click Configure.
2. Choose Custom SSL/TLS:
- Inside the configuration page, locate the Custom SSL/TLS section.
- Click on Select to customize your SSL/TLS settings.
3. Enable Strict Mode:
- Select Full (Strict) as your encryption mode.
- This option ensures full end-to-end encryption and validates your server’s certificate to protect against unauthorized access.
4. Save Changes:
- Click Save to apply the new encryption mode.
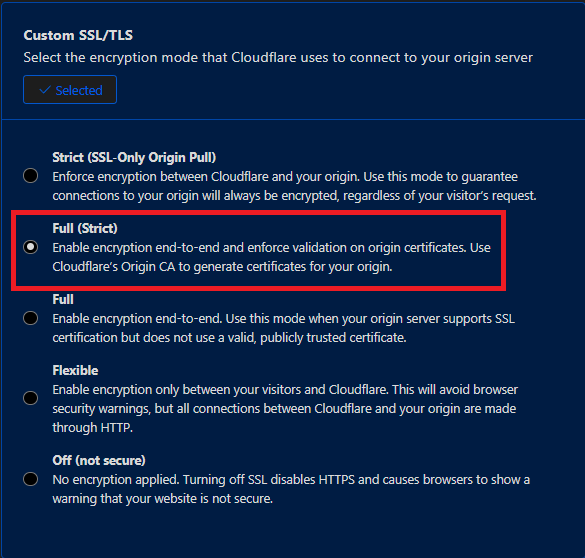
Why Use Full (Strict) SSL/TLS Mode?
Full (Strict) mode is one of the most secure SSL/TLS settings in Cloudflare and ensures complete end-to-end encryption between your visitors, Cloudflare, and your origin server. Here’s why you should use it:
1. End-to-End Encryption:
- Full (Strict) mode guarantees that all traffic between Cloudflare and your origin server is encrypted and authenticated. This ensures that sensitive data is protected from being intercepted during transit.
2. Certificate Validation:
- Cloudflare validates that the SSL certificate installed on your origin server is valid and matches the expected certificate (e.g., the Cloudflare Origin Certificate). This prevents the use of self-signed or unauthorized certificates, enhancing security.
3. Prevention of Man-in-the-Middle Attacks:
- By requiring certificate validation, Full (Strict) mode ensures that attackers cannot intercept or modify traffic between Cloudflare and your server, protecting your site from man-in-the-middle attacks.
4. Designed Specifically for Cloudflare:
- Cloudflare Origin Certificates are designed specifically for use with Full (Strict) mode. These certificates are free, easy to configure, and are fully compatible with Cloudflare’s infrastructure, making them a seamless solution.
5. Maximum Security:
- Full and Flexible modes provide encryption, but they are less secure because they allow connections without validating the server’s certificate. Full (Strict) mode closes this security gap by ensuring that only secure, valid certificates are used, offering the highest level of security.
Use Case:
If you’ve already configured a Cloudflare Origin Certificate on your server, there’s no reason not to enable Full (Strict) mode. This ensures that your server is fully secured, and that Cloudflare only communicates with the intended origin server.
This is especially important for protecting sensitive data like login credentials or payment details, as it ensures that the traffic remains encrypted and validated throughout the entire communication process.
Conclusion:
With Full (Strict) mode, you can confidently say that your website is protected by the best practices in SSL/TLS encryption. By ensuring proper validation and encryption between Cloudflare and your origin server, you’ll achieve the highest security for your site.
By following these steps, your website will be fully secured with HTTPS, leveraging Cloudflare’s SSL for encryption and protection.
To ensure external access is secure, we’re only allowing Cloudflare’s servers to communicate with our web server. This prevents any traffic from bypassing the Cloudflare tunnel, keeping your setup protected.
Creating the Cloudflare IP List Alias in pfSense
- Access the Firewall Settings:
- Log in to your pfSense dashboard.
- Go to Firewall → Aliases.
- Create a New Alias:
- Click the Add button (+).
- Under Name, enter:
Cloudflare_IP_Whitelist. - In the Description, write:
Cloudflare's IP Addresses. - For Type, select: Network(s).
- Add Cloudflare’s IP Ranges:
Note: These IP addresses can change, you can check the current IP address range for Cloudflare here.- In the Network(s) section, manually add the following IP ranges:
Cloudflare IPv4 Address Ranges:- 103.21.244.0/22
- 103.22.200.0/22
- 103.31.4.0/22
- 104.16.0.0/13
- 104.24.0.0/14
- 108.162.192.0/18
- 131.0.72.0/22
- 141.101.64.0/18
- 162.158.0.0/15
- 172.64.0.0/13
- 173.245.48.0/20
- 188.114.96.0/20
- 190.93.240.0/20
- 197.234.240.0/22
- 198.41.128.0/17
- Add each range in its respective field. If there are additional ranges, click Add Network to create more fields.
- In the Network(s) section, manually add the following IP ranges:
Cloudflare IPv6 Address Ranges (Not necessary if IPv6 on your network is disabled):
- 2400:cb00::/32
- 2606:4700::/32
- 2803:f800::/32
- 2405:b500::/32
- 2405:8100::/32
- 2a06:98c0::/29
- 2c0f:f248::/32
- Save the Alias:
- Once all IP ranges are added, click Save.
- Click Apply Changes to ensure the alias is active.
Your Alias should look like this:
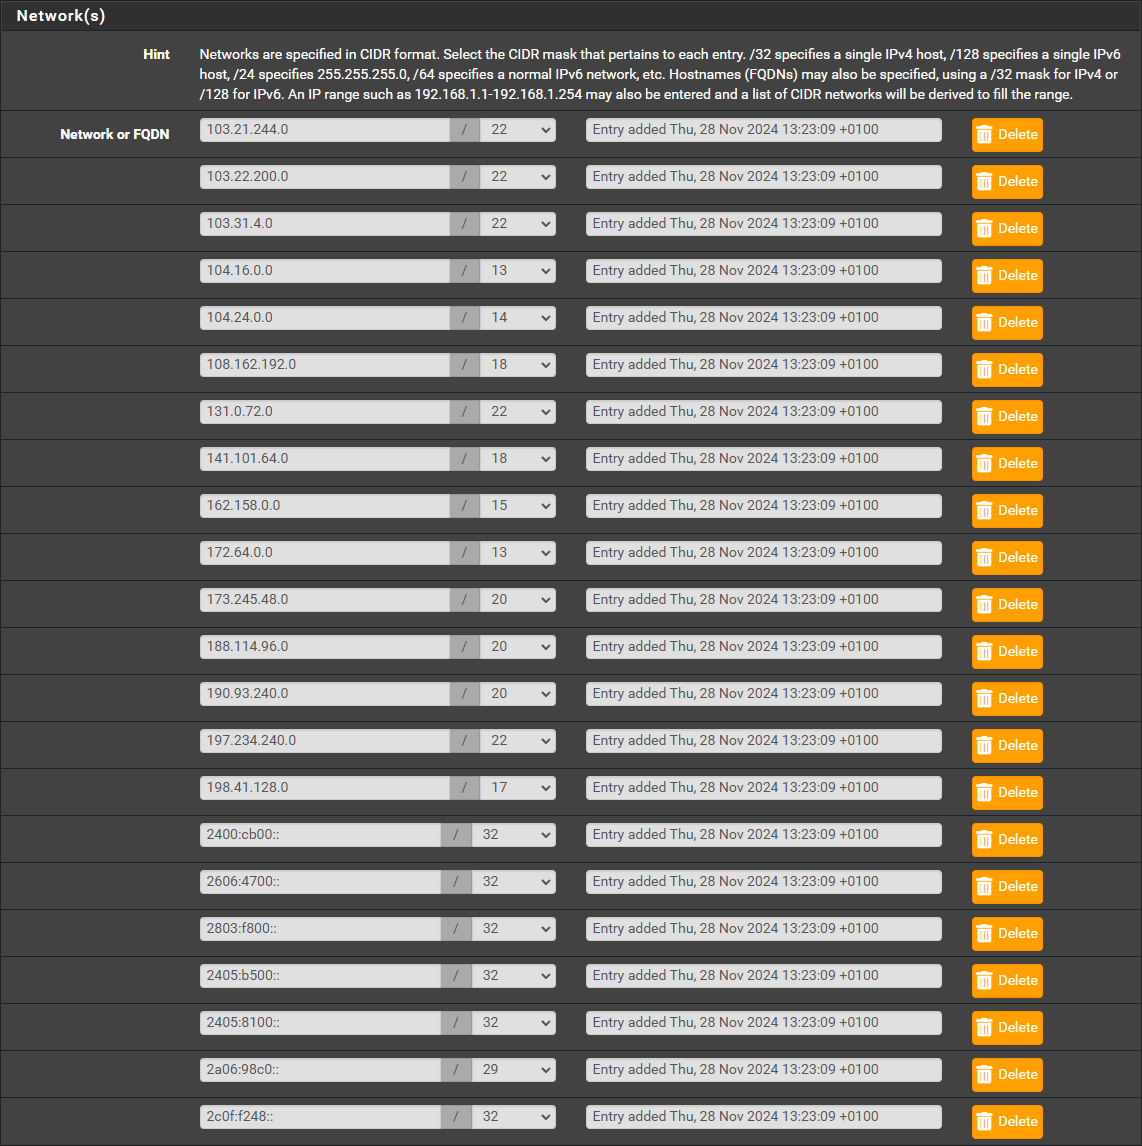
Creating the Port Alias in pfSense
- Access the Firewall Settings:
- Log in to your pfSense dashboard.
- Go to Firewall → Aliases.
- Create a New Alias:
- Click the Add button (+).
- Under Name, enter:
Cloudflare_Ports. - In the Description, write:
Cloudflare HTTP and HTTPS. - For Type, select: Port(s).
- Add the ports:
- 80 (HTTP)
- 443 (HTTPS)
- Save the Alias:
- Once both Ports are added, click Save.
- Click Apply Changes to ensure the alias is active.
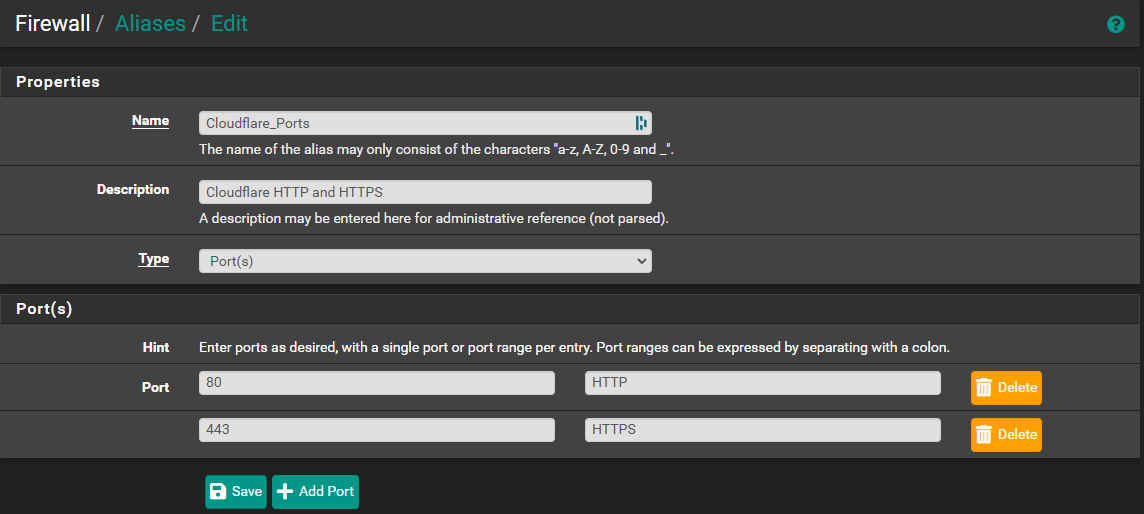
Setting Up Port Forwarding in pfSense for a Secure Cloudflare Tunnel
To ensure your web server is secure and accessible only through Cloudflare, you need to configure port forwarding in pfSense. Follow these steps:
Step 1: Log in to pfSense
- Access your pfSense web interface.
- Navigate to Firewall > NAT > Port Forward.
Step 2: Create the Port Forwarding Rule
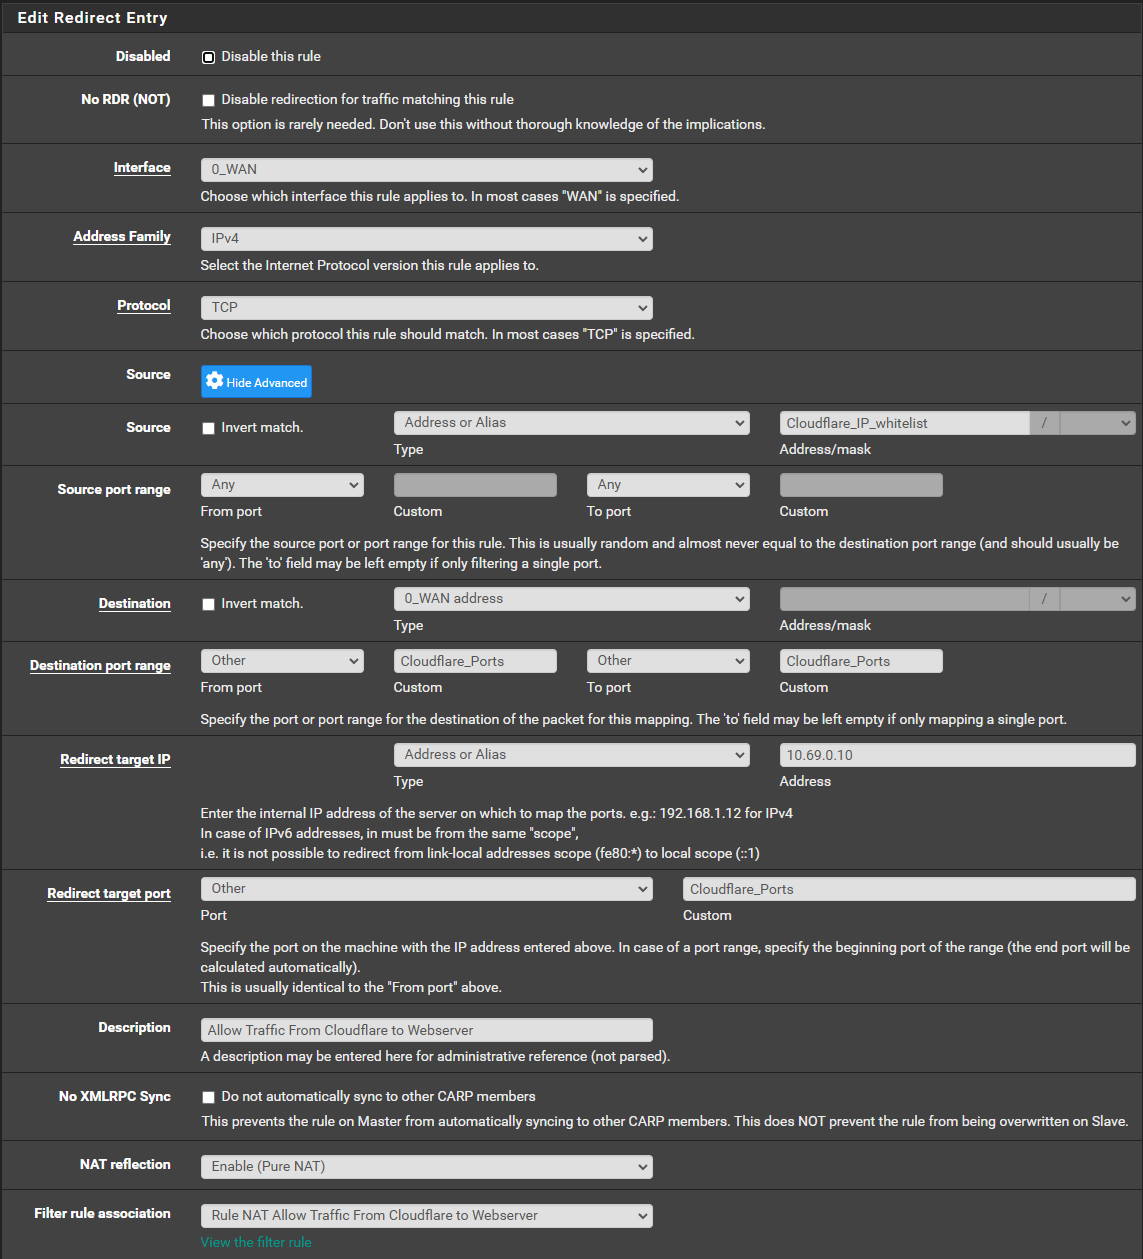
- Add a New Rule:
- Click the ‘Add‘ button (upward arrow or downward arrow, depending on your pfSense version) to create a new port forwarding rule. Make sure to place this rule above any general blocking rules to ensure Cloudflare traffic is allowed to reach your web server.
- Configure the Rule:
- Interface: Select WAN. This applies the rule to incoming traffic on the WAN interface.
- Address Family: Select IPv4. (If using IPv6, create a separate rule.)
- Protocol: Choose TCP (HTTPS traffic runs on TCP).
- Source (Click ‘Display Advanced’):
- Source Type: Choose Address or Alias.
- Address/mask: Select
Cloudflare_IP_Whitelist(the alias you created with Cloudflare’s IP ranges). - Source Port Range: Set to Any (Cloudflare uses random ephemeral ports).
- Destination:
- Choose WAN Address (your public IP address).
- Destination Port Range: Set both From and To fields to ‘Other‘ and type in both ‘Custom‘ fields, write: ‘Cloudflare_Ports‘.
- Redirect Target IP:
- Enter the private/internal IP address of your web server (e.g.,
192.168.1.100).
- Enter the private/internal IP address of your web server (e.g.,
- Redirect Target Port:
- Port type: ‘Other‘ and in the ‘Custom‘ field, write: ‘Cloudflare_Ports‘.
- Description:
- Add something meaningful, like: “Allow HTTPS traffic from Cloudflare.”
- No XMLRPC Sync: If you have multiple pfSense systems in a CARP setup, you may want to enable this to prevent rules from automatically syncing to other instances. By default, rules will migrate from the master to the slave nodes.
- NAT reflection: Set NAT Reflection to ‘Enable (Pure NAT)‘ if you need to access your domain name from inside your own network, as this ensures traffic to your web server remains encrypted via Cloudflare and avoids SSL errors caused by trying to use the public domain internally. NOTE: However, enabling it can introduce potential risks, such as unnecessary internal traffic routing through the public domain, which can complicate logging, obscure the source of internal traffic, and expose internal devices to misconfigurations—like overly permissive firewall rules or unintended access to restricted services. To mitigate these risks, you can implement strict firewall rules to control internal access and use VLANs to segment devices, ensuring that only authorized internal traffic can route through NAT Reflection. If your local devices already use the server’s internal IP address, it’s safer and simpler to leave it as ‘Use System Default.’
- Filter rule association: If you have a single internet connection, selecting ‘Add associated filter rule’ is the easiest option, as it automatically creates the necessary firewall rule to match your NAT port forwarding, but if you’re using Multi-WAN with multiple internet connections, it’s better to choose ‘None’ and manually create the firewall rules for better control over traffic routing.

Add a port forwarding rule
- Save and Apply:
- Click Save and then Apply Changes to activate the port forwarding rule.
Step 3: Verify Cloudflare Protection: Try to access your server directly using its public IP address from an external device, e.g. a cell phone on 4G. If the configuration is correct, the connection should be blocked unless routed through Cloudflare.
Why This Setup Works
- Traffic Restriction: Only Cloudflare’s IP addresses (from the alias) can reach your web server.
- HTTPS Enforcement: Port 443 ensures secure, encrypted connections.
- Port Forwarding: NAT ensures that only necessary traffic is forwarded to your internal network.
- Additional Security: Direct access to your server’s public IP is blocked, preventing bypass of Cloudflare’s protections.
Summary of the Setup
With this configuration:
- Only HTTP and HTTPS traffic (port 80 and 443) is forwarded to your internal web server.
- Traffic is filtered to allow only requests from Cloudflare’s IP ranges.
- Direct access to your server via public IP is blocked, adding an extra layer of security.
By following these steps, your web server is fully protected and securely accessible only through Cloudflare’s secure tunnel via your domain.
Note: Regularly monitor your firewall logs to identify and address potential threats, such as unusual access attempts or traffic patterns. For enhanced visibility and security, consider implementing Deep Packet Inspection (DPI) to analyze and filter network traffic effectively.
Test Your Firewall Configuration
After forwarding ports 80 and 443 exclusively to Cloudflare’s IP ranges, you can verify your setup using the ShieldsUP! tool provided by GRC. This tool tests your network for open or exposed ports.
Expected Result:
If everything is configured correctly, ShieldsUP! should report that no ports are open or accessible directly. All probing attempts should result in closed or stealth responses.
Important Note:
If the test detects any open ports, you should revisit and verify your firewall configuration. Make sure:
- Only Cloudflare’s IP ranges are allowed for ports 80 and 443.
- All other traffic is blocked by your firewall.
By using this tool, you can ensure that your server is properly protected and not directly exposed to unauthorized access.
Step 10: Finalize Your Web Hosting Setup
You’re almost there! Amazing, right?! What a journey this has been. If you’ve made it this far, thank you for sticking with me through this (admittedly quite long) guide. We’re so close to crossing the finish line, but there’s just a bit more to ensure your website is ready to shine!
At the moment, you may see a ‘Forbidden’ page when accessing your site. Don’t worry—this simply means your site doesn’t have any files yet, so the server has nothing to display. Let’s fix that and get everything ready for launch!
We will fix that later on.
Fixing SFTP for Uploading Files
To configure the web server so that I, as the account owner, have full control over files while ensuring the web server can read them and the website is publicly accessible, I followed these steps:
1. Change Ownership of the Directory
First, I changed the ownership of the directory /var/www/webserver to myself (user nuvo) while assigning the group ownership to www-data (the web server group). This ensures I can manage all files, while the web server can still read them.
Command (replace nuvo with your username):
2. Adjust Permissions
Next, I updated the directory’s permissions to allow:
- Full access (read, write, execute) for myself as the owner.
- Read and execute permissions for the
www-datagroup (so the web server can serve files). - Public read and execute permissions (so the website is accessible to everyone).
Command:
3. Enable Group Sticky Bit
To maintain consistent permissions for new files and folders created inside /var/www/webserver, I enabled the group sticky bit. This ensures that new files automatically inherit the www-data group.
Command:
4. Important Note for Subdomains
If you create additional subdomains, you’ll need to repeat these steps for their respective directories to ensure you have the proper permissions for uploading files. Simply replace /var/www/webserver (‘webserver‘) with the path to your new subdomain.
Again: Important: Do not run this command on the /var/www directory itself, as it can lead to security issues. It’s crucial that /var/www retains its default ownership and permissions for security purposes.
Connect to your SFTP server
Use a client like ‘FileZilla‘ or another FTP Program to upload files.
Connect to your server like this:
- Host: sftp://yourserverip
- Username: Enter the username associated with your Webmin or SSH account.
- Password:Enter the password associated with your Webmin or SSH account.
- Port: 2222 (we changed this from the default, remember?).
You can upload installer scripts (e.g., WordPress) or any other files you want to host on your website.
To upload new files, simply navigate to:
/var/www/yoursubdomain.
Test Your SSL Setup
- Open your browser and visit
https://yourwebsite.com. - Verify that the connection is secure (you should see a padlock icon in the address bar).
- Use SSL testing tools like SSLShopper to ensure your certificate is properly configured.
Note on Security: Since this setup uses Cloudflare as a proxy, advanced security measures like HTTPS enforcement and basic protection against XSS attacks are already in place. For a static HTML website, no additional configurations are necessary.
Additional Safety Measure: Restricting Access to Critical Services
To enhance the security of your server, it’s recommended to restrict services like MySQL, FTP, and SSH to local access only. This ensures that these critical services cannot be accessed directly from the internet, reducing the attack surface.
- What is restricted?
- MySQL: Database access is limited to local applications or scripts.
- FTP and SFTP: File access is restricted to connections within your local network.
- SSH: Remote access to your server is blocked for external networks unless securely tunneled.
How to Access These Services Remotely?
If you need to access these services from outside your local network:
- Use a VPN: Set up a VPN to securely connect to your local network from anywhere. A VPN encrypts your connection, allowing safe access to restricted services.
- Temporary Access via Firewall: If a VPN is not possible, consider temporarily opening access using your firewall, but only for specific IPs.
Why is this important?
Restricting access ensures that even if someone tries to scan your server for vulnerabilities, these critical services remain hidden and inaccessible. It:
- Prevents brute force attacks on SSH.
- Protects your database from unauthorized access.
- Reduces exposure to potential zero-day vulnerabilities.
By allowing only port 80 (HTTP) and port 443 (HTTPS) to be open to the internet, your web server remains accessible while minimizing risks to other services.
This policy keeps your server secure, efficient, and tightly controlled. For additional security, ensure that all open ports are protected by tools like Fail2Ban, firewall rules (e.g., UFW or iptables), and Cloudflare’s proxy services for HTTP/HTTPS traffic.
That’s a Wrap!
If you’ve followed my (admittedly extensive) guide all the way to the end—thank you! I truly appreciate your time and effort. My goal with this guide was not only to help you set up your self-hosted website but also to equip you with valuable experience in the world of self-hosting.
This guide took quite a bit of time and energy to create, but seeing it come together—and knowing it could help others—made every moment worthwhile. To prove it works, I followed my own instructions step-by-step to create two showcase websites. These live examples demonstrate exactly what’s possible with self-hosting.
I hope this inspires you to dive into self-hosting and explore its limitless potential. Good luck with your projects, and don’t hesitate to reach out by dropping a comment below if you have questions or need help. I’d love to hear about your experiences! 😊
And hey, why not check out the two websites I built while following this guide? Both are hosted on the same server you just learned to set up:
The only thing left for you now is to enjoy self-hosting! Make sure to regularly check your logs for intrusion attempts on both your server and firewall, and always keep your servers up to date!
Happy hosting! 🚀

