3 Easy Steps to Start Your Homelab with Proxmox
3 Easy Steps to Start Your Homelab with Proxmox
Introduction
Starting your first homelab doesn’t have to be complicated or expensive. With Proxmox, you can set up a versatile and powerful environment to explore, learn, and host your projects. In this guide, we’ll walk you through the three key steps to get started.
Why I made this article
I use Proxmox extensively in my guides because it’s an incredibly powerful and user-friendly tool for virtualization. Whether you’re setting up a simple homelab or diving into more advanced self-hosting projects, Proxmox provides the flexibility and scalability needed to make it all possible.
This article is designed to help beginners get started with their first homelab. I wanted to simplify the process, break down the key steps, and show how easy it can be to create your own virtualized environment. My hope is that by following this guide, you’ll gain confidence in using Proxmox and discover the endless possibilities of a homelab.
If this is your first time working with virtualization, don’t worry—you’re not alone. Everyone starts somewhere, and mistakes are part of the process. That’s why I included tips like taking snapshots of your virtual machines to save you time and frustration while you learn.

Step 1: Plan Your Homelab
Before diving in, take a moment to plan. A good plan ensures your homelab meets your needs without unnecessary headaches.
What to Consider
- Define Your Goals:
Are you looking to test new software, learn virtualization, or host a personal website? Clear goals help determine the type of hardware and resources you need. - Choose Your Hardware:
You don’t need expensive gear. Repurpose an old PC, or find a budget-friendly mini PC like an HP ProDesk or Dell OptiPlex. Here’s a simple checklist:- Processor: At least a quad-core CPU (Intel i5 or AMD Ryzen 5 equivalent works great).
- RAM: Minimum of 8GB, though 16GB or more is ideal for multiple VMs.
- Storage: SSD for speed (e.g., 256GB SSD) and optional additional HDDs for bulk storage.
- Network: A wired Ethernet connection for stability.
Optional Add-Ons
- UPS (Uninterruptible Power Supply): For power outages.
- Network Switch: If you plan to expand.
- External Storage: Backup your critical data.
Why This Step Matters
Proper planning prevents wasted time and ensures your setup evolves with your skills.
Step 2: Install and Configure Proxmox
Now that your hardware is ready, it’s time to install Proxmox.
Download Proxmox VE
- Get the ISO from the official Proxmox website.
Create a Bootable USB
- Use tools like Rufus (Windows) or Etcher (Windows/Linux/macOS) to prepare your USB drive.
- Ensure the USB drive has at least 2GB of storage.
- In this guide, we’ll use Etcher:
- Download and install Etcher.
- Insert your USB drive.
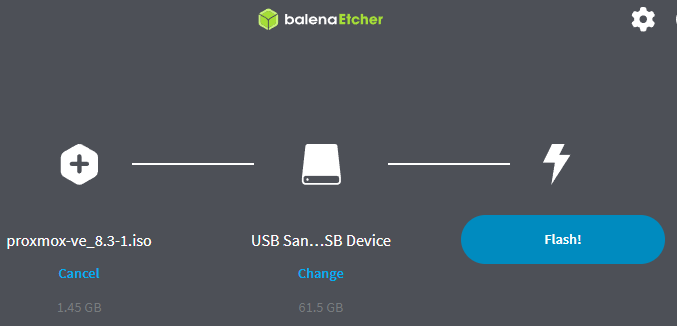
- Follow the steps in Etcher to flash the Proxmox ISO to the USB.

Select the Proxmox ISO image, then select your Flash drive, then click ‘Flash‘. - After clicking ‘Flash‘ you’ll be prompted for administrator priviliges, click ‘Yes‘.
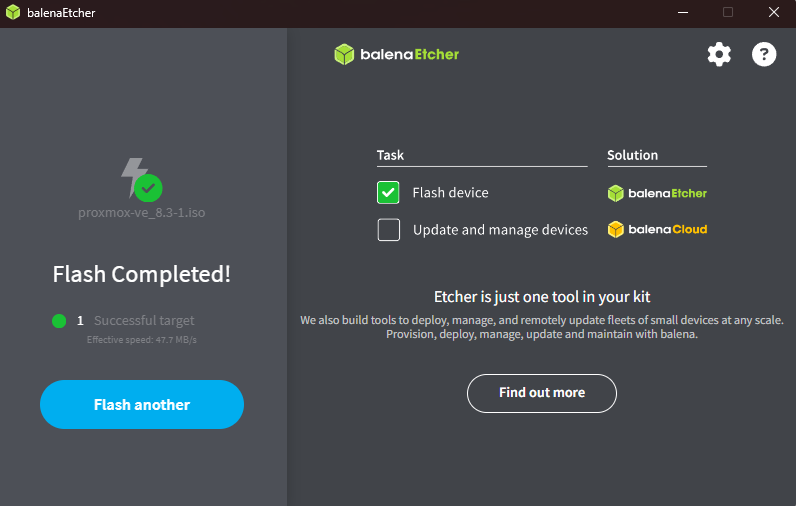
- After flashing your USB drive, you should see this screen:

Flashing is finished.
Additional troubleshooting
If you don’t see your USB-drive listed, open up Disk Management in Windows: Right click on the Windows button or press ‘Windows-Key+X‘ and click on ‘Disk Management‘. Then look for your USB drive.
It should look like this:

Here you can see the device is “Removable” and ‘Disk 9’. We need this to proceed.
- USB Drive Not Being Listed: If your USB drive isn’t showing up in Etcher or Rufus, you may need to clean the drive. Follow these steps to prepare it:
- Open Diskpart:
- Press the Windows key, type
diskpart, and press Enter. - Click Yes on the User Account Control (UAC) prompt to run it as an administrator.
- Press the Windows key, type
- Identify Your USB Drive:
- In the Diskpart window, type
list diskand press Enter. - Identify your USB drive from the list (e.g.,
Disk 9in this example).- If you’re unsure which drive is correct, open Disk Management (type it in the Start menu) to confirm.
- Double-check, as selecting the wrong disk can result in data loss on another drive.
- In the Diskpart window, type
- Select the USB Drive:
- In Diskpart, type
sel disk #(replace#with the number of your USB drive, e.g.,sel disk 9) and press Enter.
- In Diskpart, type
- Clean the Drive:
- Type
cleanand press Enter. This will erase all data and reset the drive.
- Type
- Retry in Etcher or Rufus:
- Close Diskpart.
- Open Etcher or Rufus again and list your drives. The USB drive should now appear and be ready for use.
Warning: Always verify the correct disk before performing these steps to avoid accidental data loss.
- Open Diskpart:
Before We Install Proxmox: Configure Your BIOS
Before diving into the Proxmox installation, we need to ensure that your system’s BIOS is configured correctly for virtualization. Without this, you might encounter an error like:
“No support for hardware-accelerated KVM virtualization detected. Check BIOS settings for Intel VT / AMD-V / SVM.”
This error indicates that virtualization support (Intel VT-x or AMD-V) isn’t enabled in the BIOS. Follow these steps to ensure your BIOS is “fit for purpose”:
Step 1: Access the BIOS
To access the BIOS, restart your system and press the designated BIOS key during startup. Common BIOS keys include:
- Acer: F2 or Del
- Asus: F2, Del, or F10
- Dell: F2 or F12
- HP: F10 or Esc
- Lenovo: F1 or F2
- MSI: Del
- Toshiba: F2
- Gigabyte: Del
- Apple (Intel-based Macs): Hold Option (Alt) during startup
Note: These keys may vary depending on the model and age of your system. If none of these work, consult your user manual or the manufacturer’s website.
Step 2: Enable Virtualization
Once in the BIOS:
- Navigate to the Advanced Settings, CPU Configuration, or Processor Settings section (the exact name may vary depending on your BIOS).
- Look for the following options:
- Intel VT-x or Intel Virtualization Technology (for Intel CPU’s).
- AMD-V or SVM Mode (for AMD CPU’s).
- Enable the virtualization setting.
- Save your changes and exit the BIOS (typically by pressing F10 and confirming).
Why Is This Important?
Proxmox relies on KVM (Kernel-based Virtual Machine) for virtualization. Without hardware acceleration enabled, virtual machines will not run efficiently—or at all. Properly configuring your BIOS ensures your system is ready for the Proxmox installation.
Boot the system from the USB drive
- Plug the USB drive into your homelab hardware.
- Restart the system and repeatedly press the designated Boot Menu key during startup (commonly referred to as “spamming the button”). Common Boot Menu keys include:
- Acer: F12
- Asus: Esc or F8
- Dell: F12
- HP: Esc or F9
- Lenovo: F12 or Enter
- MSI: F11
- Toshiba: F12
- Gigabyte: F12
- Apple (Intel-based Macs): Hold Option (Alt)
- Once in the Boot Menu, select your USB drive and press Enter to boot from it.
Tip: Timing is crucial. Start pressing the key as soon as the system powers on, and don’t hesitate to press it repeatedly to ensure the Boot Menu is triggered.
Proxmox Installation Process
NOTE: If you have a smaller SSD (SATA), it is recommended to install Proxmox on this drive. Proxmox will provision a ‘Local’ disk, a small partition used for image files and system data. While Proxmox itself doesn’t require much storage or benefit significantly from high-speed disks, having your virtual machines (VM’s) stored on a faster NVMe drive will greatly improve performance. This setup ensures that Proxmox runs efficiently without wasting your high-performance storage.
- Start the Installer
- When the Proxmox boot screen appears, select Install Proxmox VE (Graphical) and press Enter.
- Accept the License Agreement
- Read through the license terms and press Agree to proceed.
- Select the Target Disk
- Choose the disk where Proxmox VE will be installed.
- For single-drive setups, select your SSD or HDD as the installation target. HDD’s are not recommended due to their slower performance, which can significantly affect the responsiveness of Proxmox and virtual machines. An SSD will provide much better speed and reliability for your homelab setup.
- For advanced setups, configure ZFS options (optional).
- Click Next when ready.
- Choose the disk where Proxmox VE will be installed.
- Configure the Location and Timezone
- Select your country: Type in the name of your country in the search field and select it from the dropdown list. This ensures that your timezone and regional settings are configured correctly.
- Set your timezone, keyboard layout, and language preferences.
- Confirm your settings and click Next.
- Create a Password and Set an Email Address
- Enter a secure password for the root user.
- Provide an email address for system alerts and notifications.
- Click Next to continue.
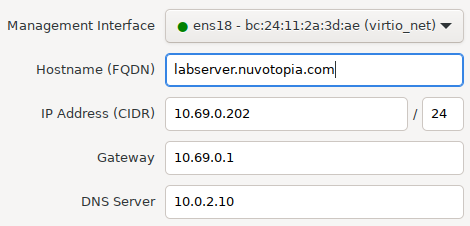
- Configure the Network Interface
- Select the network interface (e.g., ‘eth0‘), note its MAC address, verify it in your router’s DHCP settings, and set a static IP address to ensure consistent network access.
- Hostname (FQDN): Enter a hostname for your Proxmox server (e.g.,
proxmox.local). - Assign a static IP address, subnet mask, and gateway.
- Example: IP:
192.168.1.100, Subnet:255.255.255.0, Gateway:192.168.1.1. - IP Address (CIDR) should look if the information above was to be correct: 192.168.1.100/24.
- Example: IP:
- Click Next to proceed.

Enter the information above based on your specific setup.
- Start the Installation
- Review the summary of your configuration.
- Click Install to begin.
- The installation process will take a few minutes.
- Reboot the System
- Once installation is complete, remove the USB drive.
- Click Reboot to restart your system.
- Installation finished!
- When the installation is successful, you’ll be greeted with the following message:“You can now remove the installation media and reboot the system.”After rebooting, your Proxmox server is ready to be accessed and configured! 🎉

Installation Complete!
- When the installation is successful, you’ll be greeted with the following message:“You can now remove the installation media and reboot the system.”After rebooting, your Proxmox server is ready to be accessed and configured! 🎉
- Web Interface: Access Proxmox by typing the server’s IP address into your browser (e.g.,
https://192.168.x.x:8006). You may encounter a warning about an invalid certificate—this is normal. Simply choose to ignore the warning and proceed to the web interface. - NOTE: If you’re using a laptop, it can be used to access the host directly. If you’re using a server or a desktop PC, you can now disconnect the screen, mouse, and keyboard, as long as you’re able to access the server through the web interface.
After logging in
You’ll be prompted with a ‘No valid subscription’ message. Simply click ‘OK’ to proceed. Don’t worry—we’ll guide you through the steps to remove this annoying message in a later guide, as it will appear every time you log in.
Congratulations—Time to Start Virtualizing!
You have now successfully installed your Proxmox virtualization server. The hard part is done, and you’re ready to start creating and managing virtual machines. Explore, experiment, and let your homelab journey begin! 🚀
Step 3: Set Up Your First Virtual Machine
With Proxmox installed, it’s time to create your first virtual machine and start experimenting.
Creating a Virtual Machine
- Download an OS ISO: Pick an OS like Ubuntu Server (we’ll use this in our guide) or Debian from their official sites.
- Upload to Proxmox: Go to
Datacenter > Storage > ISO Imagesand upload the ISO. - Create a VM:
- Click
Create VMin Proxmox. - Choose a name and select the uploaded ISO.
- Allocate resources (e.g., 2 CPU cores, 4GB RAM, 20GB storage).
- Finish the setup and start the VM.
- Click
Installing the OS
Follow the OS installation steps within the VM. Here’s how to proceed for Ubuntu Server:
- Choose Minimal Installation:
Select the minimal installation option to keep the system lightweight and focused. - Set Up a Hostname, Username, and Password:
Enter a unique hostname for the server, create a user account, and set a secure password. - Install SSH for Remote Management:
Ensure that SSH is installed so you can manage the server remotely.
For more detailed instructions, refer to our comprehensive installation guide for step-by-step assistance.
Configuring Your First Service
- Try hosting a simple web server:
- Install Nginx:
sudo apt update && sudo apt install nginx. - Test it by visiting the VM’s IP address in your browser.
- Install Nginx:
Why This Step Matters:
This step brings your homelab to life, allowing you to learn and tinker with services in a controlled environment.
Additional
Snapshots:
- Snapshots allow you to take a “picture” of your VM’s current state.
- Use snapshots before making significant changes or updates. If something goes wrong, you can quickly revert to the snapshot and restore the VM to its previous state.
How to Take a Snapshot in Proxmox:
- Navigate to your VM in the Proxmox web interface.
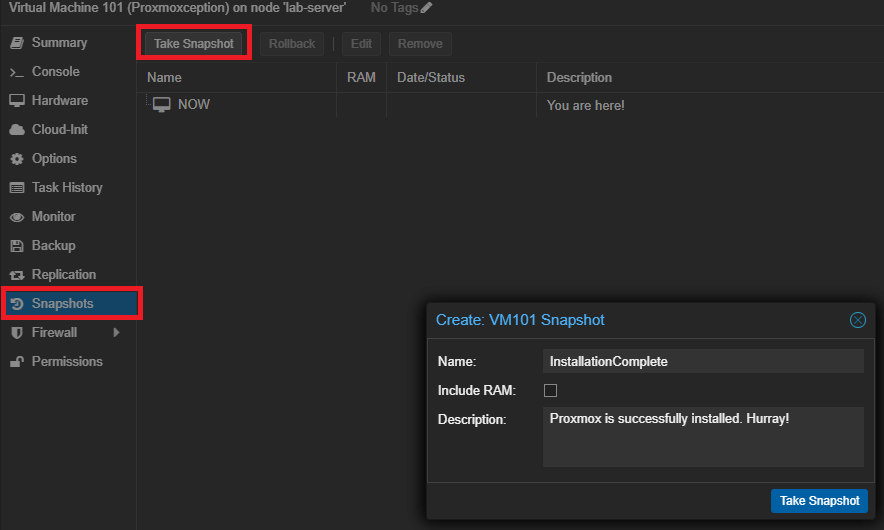
- Select the ‘Snapshots‘ tab and click ‘Take Snapshot‘.
- Name your snapshot and optionally include a description, then untick ‘Include RAM‘ to ensure the snapshot only reflects the VM’s powered-on or powered-off state based on your last change.
- Click on ‘Take Snapshot‘ again to create a snapshot of your server.

Tip: Regular snapshots can act as a safety net during experimentation or testing.
Rollback a Snapshot in Proxmox:
You can easily roll back to any snapshot by selecting it from the list. Having descriptive names makes troubleshooting more efficient and ensures convenience when managing your virtual machines.
To roll back:
- Navigate to the ‘Snapshots‘ tab of your VM.
- Select the snapshot you want to roll back to.
- Click ‘Rollback‘ and confirm the action.
- The VM will be reverted to the exact state it was in when the snapshot was taken.

Tip: Use clear and detailed names and descriptions for your snapshots (e.g., “InstallationComplete”) and add your changes in the description to make it easier to identify the right snapshot when troubleshooting or testing configurations.
Proxmox Setup: Tips and Tricks for Beginners
This guide serves as a straightforward introduction to Proxmox, providing an overview of what it is, step-by-step instructions for installation, and a walkthrough on how to create and set up your first virtual machine (VM). It’s designed to help beginners take their first steps into the world of virtualization using Proxmox’s powerful and user-friendly platform. If you’re looking to dive deeper, additional guides covering advanced topics and Proxmox’s more intricate features will also be available here for further exploration.
Conclusion: Start Your Homelab Journey Today!
Setting up your first homelab with Proxmox is an exciting and rewarding experience. With just a bit of planning, a straightforward installation, and a few clicks to create your first virtual machine, you’ll be on your way to mastering virtualization and exploring endless possibilities.
Virtualization offers incredible flexibility, enabling you to move beyond multiple physical servers and unlock the full potential of your hardware. You can run multiple systems simultaneously, adapt to changing needs, and scale your setup effortlessly. This isn’t just practical—it’s a valuable skill that can elevate your IT expertise, whether for personal projects or professional growth.
I typically use Ubuntu Server 24.04 on Proxmox in my guides because it’s simple, reliable, and versatile. However, Proxmox supports a wide range of operating systems, so you can tailor your setup to match your preferences and goals.
Ready to take the next step? Dive deeper into our related guides: Homelab & Self-hosting and Server & Virtualization.
If this is your first time setting up a homelab or self-hosted services, don’t be discouraged if things don’t work out perfectly at first. Mistakes are part of the learning process. Remember to take snapshots of your VM’s before experimenting, so you can easily roll back if something doesn’t work as intended.
And always remember: Learn, Break, Fix, Repeat – Have fun! 🧠💥🛠️🔁🤓


