Easy Guide on Installing Ubuntu Server 24.04 on Proxmox
Installing Ubuntu Server 24.04 on Proxmox is easy by following this easy guide
Ubuntu Server is, in my opinion, one of the best distributions for various projects. In nearly every guide or homelab & self-hosting article I share, you’ll see Ubuntu Server as my go-to choice. Now, let’s dive into how to install Ubuntu Server 24.04 on Proxmox – a powerful and resilient virtualization software for barebone setups like a PC or server. Whether for DNS, networking, or even lightweight applications, Ubuntu Server has you covered. One of my favorite projects with it is Pi-hole with Unbound, turning it into your very own recursive DNS server.

Upload the ISO to your Proxmox Server
- Download ubuntu-24.04.1-live-server-amd64.iso
- Log into your Proxmox Server
- Navigate to Datacenter -> Your Server Name -> Local -> ISO Images -> Upload
- After uploading, it should look like this:

Create a VM in Proxmox
Click on Create VM in the top right and follow these steps

Proxmox Create VM – General
Node:If you have multiple nodes, choose the one you want to install your VM on.
VM ID: If you want a custom ID for this VM, choose one. Otherwise, keep the default.
Name: Give your server a memorable name, e.g. “Pi-hole” or something relevant to your project. A descriptive name makes managing multiple servers easier!
Use CD/DVD disc image file (iso)
Storage: Local
ISO image: ‘ubuntu-24.04.1-live-server-amd64.iso’
Then click “Next”

System settings
Graphic card: Default
Machine: Default (i440fx)
BIOS: Default (SeaBIOS)
SCSI Controller: VirtIO SCSI Single
Qemu Agent: Ticked (this enables better control over the VM from the Proxmox interface, including easier access to the server’s IP address and management features like shutdown and restart). We need to configure this later.
Add TPM: Unticked

Disks section
BUS/Device: VirtIO Block | 0
Storage: Choose the drive where you want this VM to be stored.
Disk size (GiB): 16GB is generally sufficient for most projects. If you anticipate higher storage needs, allocate more disk space to the VM accordingly.
Cache: Default (No cache)
Discard: The Discard option in Proxmox (and virtualization in general) enables the TRIM command, which helps SSDs and NVMe drives reclaim unused storage space and maintain performance over time.
What Does Discard (TRIM) Do?
When a virtual machine deletes data, it marks the space as unused in the filesystem, but the underlying SSD or NVMe drive isn’t automatically informed that the space can be reused. Enabling Discard sends a TRIM command from the guest OS to the storage, which:
- Notifies the SSD/NVMe drive that unused space can be reclaimed.
- Improves write performance and the lifespan of the SSD/NVMe by reducing unnecessary write operations.
- Optimizes storage pool usage, especially when using thin provisioning.
If you’re using an HDD, you should not enable this (TRIM has no effect on traditional hard drives).
IO thread:
If you’re using one CPU core on this VM, it’s not necessary to enable IO Thread – this is most useful when multiple CPU cores are available, as it allows disk operations to run in parallel with other tasks.
If you’re using just one core, everything will share that single core, so enabling IO Thread won’t make a difference.
Recommendation: If you only want to use one core, you can leave IO Thread disabled. If you add more cores later, you can enable it to improve disk performance.

CPU section
Sockets: 1
Cores: 1 – For most projects, 1 socket and 1–2 cores are usually sufficient for lightweight tasks like DNS servers, small web servers, or self-hosted projects (e.g., ‘Pi-hole‘ or ‘Home Assistant‘).
Type: x86-64-v2-AES

Here are some general recommendations:
- Lightweight projects (e.g., Pi-hole, small websites): 1 socket, 1 core.
- Moderate projects (e.g., Nextcloud, small databases): 1 socket, 2 cores.
- Resource-intensive projects (e.g., large databases, media servers like Plex): 1 socket, 4 cores or more.
Memory Section
To install Ubuntu Server, you need at least 1024 MiB (1 GiB) of RAM. Here are some recommendations based on different use cases:
- Basic setups (e.g., Pi-hole, lightweight services): 1–2 GiB should be enough.
- Moderate setups (e.g., Nextcloud, small databases): 2–4 GiB is ideal to handle moderate workloads.
- Resource-intensive setups (e.g., media servers like Plex, larger databases): 4 GiB or more is recommended for smooth performance.
Adjust the RAM according to the specific demands of your project to ensure optimal performance.
Network Section
No network device: Unticked
Bridge: vmbr0 (unless you have multiple network interfaces or VLANs configured
VLAN Tag: No VLAN (unless you have VLANs)
Firewall: Unticked – Since we configure the firewall using UFW within the VM, there’s generally no need to enable the Proxmox firewall for additional security. Keeping it unticked can simplify network management by avoiding duplicate firewall layers.
Another reason to keep this unticked is that we’ll be enabling UFW later in this guide, which will handle firewall rules directly within the VM, making an additional Proxmox firewall unnecessary.
Most routers are set by default to block all incoming traffic from external sources, preventing access to your network from outside. However, it’s a good idea to double-check this setting in your router’s firewall to ensure no unwanted access is allowed.

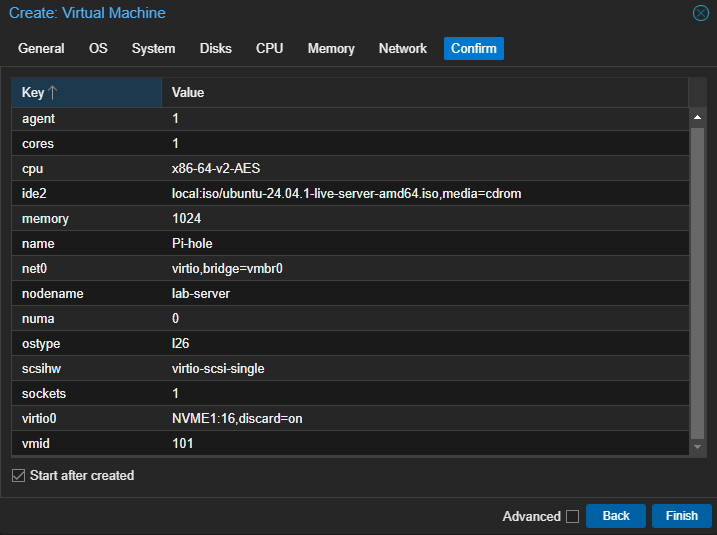
Confirm Section
This is what my confirm page looks like.
Start after created: Ticked (unless you want to make some final changes before proceeding with the installation).
Click: ‘Finish’
Install Ubuntu Server
- If the server has started, double-click on the recently created VM. In this example, it’s labeled as “101 (Pi-hole).”
- Wait for the installation script to start, then choose your desired language. In my case, English
- Use the arrow keys on your keyboard or ‘Tab’ to navigate. Select ‘Update to the new installer’ and press Enter.
- If your keyboard is English (US), click ‘Done’. Otherwise, click ‘Identify keyboard’. This is important if you plan to use the console via Proxmox.
- After your keyboard has been identified, click ‘Done’. If it wasn’t correctly identified, you can manually select it or click ‘Identify keyboard’ again.
- “Choose the base for the installation”: Don’t make any changes here, use “Ubuntu Server” and click ‘Done’
- Make sure to take note of the IP address and MAC address, as we’ll need these later.

IP address and MAC address Then click ‘Done’
- Proxy address: Keep empty unless you’re using a proxy.
- Wait for the mirrors to be tested. Once it’s finished, you’ll see ‘This mirror location passed tests’.
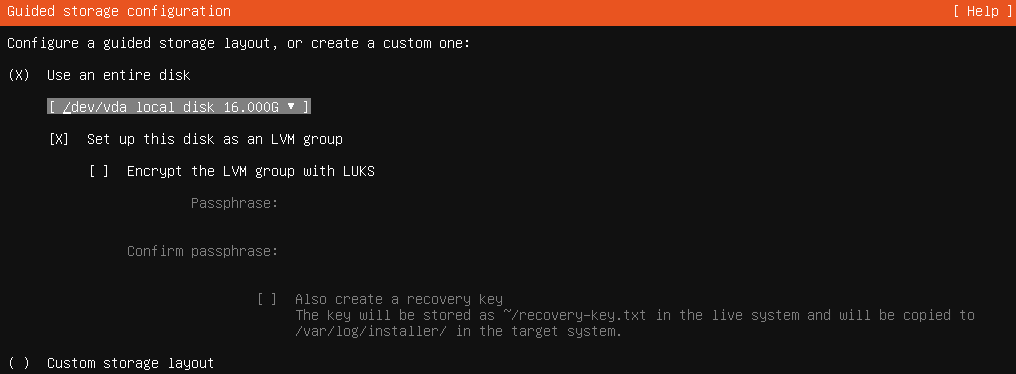
- On the ‘Guided storage configuration’ page, keep it on ‘Use an entire disk’, then click ‘Done’

Guided storage configuration - Click ‘Done’ again
- Confirm destructive action: Click ‘Continue’
- Profile configuration:
Your name: Choose a name for your profile, e.g., “MyServer” or a name relevant to the project.
Your servers name: Pick a server name that’s easy to remember, like “pihole” or something related to the project.
Pick a username: Choose a unique username for this server (avoid common names like “admin” for security).
Choose a password: Create a strong password.
Confirm your password: Re-enter the password to confirm. - Upgrade to Ubuntu Pro: Select ‘Skip for now‘, then click ‘Continue‘
- Tick ‘Install OpenSSH server’ using spacebar, then click ‘Done‘
- Featured server snaps: Don’t tick anything, press ‘Tab‘, then click ‘Done‘
- Wait for the installation to complete. Drink some coffee or tidy up while waiting, as this might take some time.
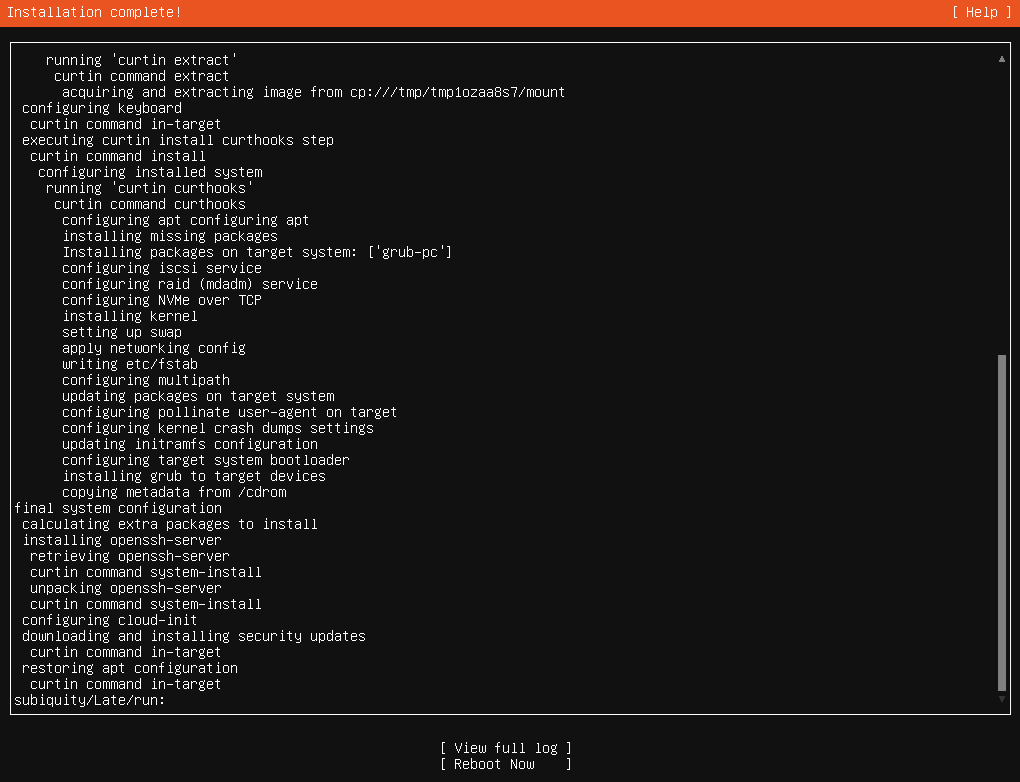
- Installation complete!

Installation is complete When this shows up, click ‘Reboot Now’.
- Go to the Proxmox Web Interface -> Click on your newly created VM -> ‘Hardware‘ -> ‘CD/DVD Drive (ide2)‘ -> Double click this and select ‘Do not use any media‘ -> Click ‘OK’.
- Go back to your Console window and press ‘Enter’ after a short wait, you should be prompted to log in.
Further Configuration (Optional)
These steps are completely optional.
1.) For better integration between Proxmox and your virtual machines (VMs), it is recommended to enable the QEMU Guest Agent (remember we did that in the installation?). You can install the agent using the following command:
sudo apt-get install qemu-guest-agent && sudo service qemu-guest-agent start
Press ‘Y’ and then click ‘enter’.
After this, you’ll see more information about the VM in Proxmox:
- Correct CPU usage
- Correct RAM usage
- IP address of the VM
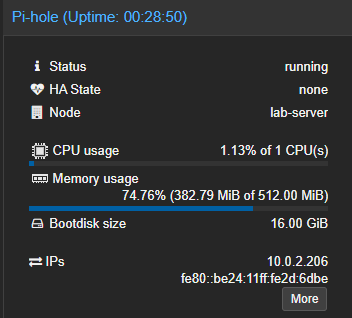
This additional data improves VM monitoring and management in Proxmox.
2.) Firewalls are an important security measure in networks. Even if your network is tightly secured with a firewall, your VMs should also have their own firewalls. You can never be too careful.
Start by installing UFW with the following command:
sudo apt-get install ufw
After installing UFW, time to set up some rules:
To allow SSH access to your server, use the command:
sudo ufw allow 22/tcp
This command enables communication on port 22 (TCP), used for SSH, which allows you to control your server remotely (e.g., using ‘PuTTY’).
Adding Multiple Rules at Once
To allow SSH, HTTP, and HTTPS traffic in a single command, use:
sudo ufw allow 22/tcp && sudo ufw allow 80/tcp && sudo ufw allow 443/tcp
The ‘&&‘ operator combines commands to run sequentially. After running this command, the following ports are open for communication:
- 22 (TCP) – SSH (Remote control, e.g., via ‘PuTTY’).
- 80 (TCP) – HTTP (Useful if you’re hosting a web server).
- 443 (TCP) – HTTPS (Useful if you’re hosting a secure web server with certificates)
Enable UFW with logging enabled and how to check logs:
To enable UFW, enable it by the command:
sudo ufw enable
Note:
If you’re enabling UFW over SSH (e.g., using ‘PuTTY’), ensure its access is allowed first with ufw allow 22/tcp to avoid being locked out.
Enable Logging:
sudo ufw logging on
Checking UFW logs:
tail -f /var/log/ufw.log
The tail -f command displays the latest log entries and updates them in real time. To stop viewing, press Ctrl + C.
Summary
Congratulations! You’ve successfully installed Ubuntu Server 24.04 on Proxmox.
Now, you’re ready to install almost any service you can imagine. The possibilities are nearly limitless.
Great job, and happy homelab and self-hosting adventures!


