Install Windows 10 on Proxmox – Simple and Easy
Install Windows 10 on Proxmox – Simple and Easy
Introduction
Proxmox is a powerful, open-source virtualization platform designed to simplify the management of virtual machines (VM’s) and containers. Whether you’re an IT enthusiast building a homelab, a developer testing new software, or someone looking to set up a reliable remote desktop environment, Proxmox offers an efficient, flexible, and cost-effective solution for virtualization.
Installing Windows 10 on Proxmox is a fantastic way to expand your virtual environment, providing you with a versatile platform for productivity, experimentation, and learning. By combining Proxmox’s advanced features like resource allocation, snapshots, and network management with the flexibility of Windows 10, you’ll have a robust system capable of handling a wide range of tasks—from running legacy applications to hosting development environments or virtual workstations.
In this guide, we’ll walk you through every step of the process, ensuring it’s as simple and easy to follow as possible. Whether you’re new to Proxmox or a seasoned user, you’ll find clear instructions and helpful tips to get your Windows 10 VM up and running smoothly. Let’s get started and unlock the full potential of virtualization with Proxmox!
Prerequisites
Before we get started, here’s what you need:
- Proxmox VE: Installed and running on your system. If you haven’t set it up yet, check out our Proxmox installation guide.
- Windows 10 ISO: Download the official ISO from Microsoft’s download page.
- Windows 10 License Key (optional but recommended): A valid key for activating your Windows installation. While activation is not strictly necessary, it unlocks full functionality, such as personalization options and access to all features. Do keep in mind that there is a significant price difference between Windows 10 Home and Pro, so choose the edition that best suits your needs.
- Minimum Hardware: Ensure your Proxmox host has enough resources to allocate to the VM:
- 4 GB RAM (minimum for smooth operation).
- 2 CPU cores.
- 64 GB storage (Preferrably an SSD or NVMe)
- Basic Proxmox Knowledge: Familiarity with Proxmox’s web interface is helpful but not required.
Step-by-Step Guide
Step 1: Download and Upload the necessary ISO’s
- Download the official ISO from Microsoft’s download page.
- Find the “Create Windows 10 installation media” and click on ‘Download Now‘.
- Open the MediaCreationTool that you’ve just downloaded and run it.
- Accept the license terms and select “Create installation media (USB flash drive, DVD, or ISO file) for another PC” then click ‘Next‘.
- Choose the language if you want something other than the default, otherwise leave “Use the recommended options for this PC” checked and click ‘Next‘. Then, select the location where you want to save the ISO file, e.g., your Desktop, and click ‘Save‘. After the download completes, click ‘Next‘ in the tool to continue. When done, click ‘Finish‘.
- Download the VirtIO drivers ISO (needed for Proxmox) from Proxmox’s official site and save it for later use on your Desktop alongside the Windows 10 ISO.
- Log in to your Proxmox web interface.
- Navigate to the Datacenter > Your server’s name > Local > ISO Images.
- Click Upload and select the Windows 10 ISO and VirtIO ISO files (separately). Wait for both uploads to complete.
- To see both uploads you might have to refresh the page after it’s finished. Press ‘F5‘ or ‘CTRL+F5‘.
Step 2: Create a Virtual Machine (VM)
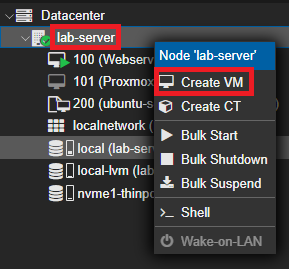
- In the Proxmox interface, click Create VM in the top-right corner or right click on your server and click ‘Create VM‘

Create Windows 10 VM in Proxmox - Fill in the following details:
- Node: Choose the Proxmox server you’re working on.
- VM ID: Automatically assigned or customized as needed.
- Name: Enter a descriptive name for your VM, such as “Windows10-VM”.
- Click Next to proceed through the wizard and configure the VM’s hardware:
- OS Section: Under “Use CD/DVD disc image file (iso)” select your Windows 10 ISO. Then under “Guest OS:” Select: “Microsoft Windows”. Tick the “Add additional drive for VirtIO drivers” and select the VirtIO ISO image.

Proxmox OS Section - System: Under “BIOS“, select ‘OVMF (UEFI)‘. While UEFI is not required for Windows 10, it is recommended for better compatibility. Additionally, store the EFI disk on the same storage as the system disk for improved performance and easier management.

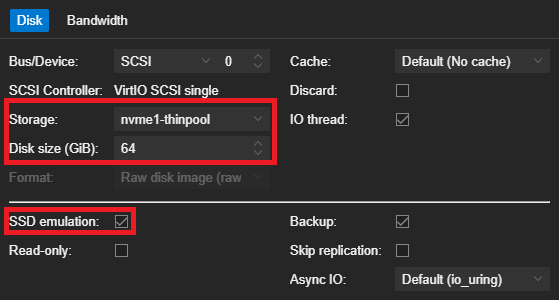
Proxmox Create VM -> System - Disk: Allocate at least ‘64 GB‘ of storage. Select under “Storage” which disk you want to install Windows on. If you’re using an NVMe or an SSD, enable “SSD emulation” for better performance; otherwise, leave it off.

Proxmox Disk Setup for Windows 10 when using a SSD or NVMe. - CPU Section: Allocate at least 2 cores. Click on “Advanced” to access “Extra CPU Flags”. To enable an option, press ‘+’ next to the desired flag under “Extra CPU Flags”.
- hv-tlbflush
- Why: Improves performance for Windows guests on overcommitted systems.
- Recommendation: Enable.
- hv-evmcs
- Why: Boosts performance for nested virtualization, which allows running virtual machines inside another virtual machine (useful for testing or lab setups).
- Recommendation: Enable if you need nested virtualization.
- aes
- Why: Activates hardware-accelerated AES instructions, improving performance for encrypted applications (e.g. VPN’s).
- Recommendation: Enable.
- spec-ctrl, ssbd, ibpb, virt-ssbd, amd-ssbd
- Why: Mitigates Spectre and Meltdown vulnerabilities, critical for virtual environments.
- Recommendation: Enable the ones matching your CPU:
- Intel:
spec-ctrl,ssbd - AMD:
ibpb,virt-ssbd,amd-ssbd
- Intel:
- md-clear
- Why: Ensures the guest OS is aware that MDS (Microarchitectural Data Sampling) vulnerabilities have been mitigated, protecting against potential data leaks caused by CPU flaws.
- Recommendation: Enable.
- pcid
- Why: Reduces the performance impact of Meltdown mitigations on older Intel CPUs.
- Recommendation: Enable for supported Intel CPUs.
- hv-tlbflush
- Summary
- For optimal performance and security on a Windows 10 VM, enable:
- hv-tlbflush
- aes
- CPU-specific security flags:
- Intel:
spec-ctrl,ssbd,md-clear,pcid,hv-evmcs - AMD:
ibpb,virt-ssbd,amd-ssbd
- Intel:
This ensures your VM runs smoothly with optimized performance, allows nested virtualization for running VMs inside the VM, reduces resource overhead, and protects against critical CPU vulnerabilities like Spectre and Meltdown, which can leak sensitive data.
- NUMA (Non-Uniform Memory Access) is a memory design commonly found in multi-socket CPU servers, where memory access time depends on its proximity to the processor. If you’re using a regular desktop PC or a small-form-factor PC, you can safely skip this setting.
- Why you should enable NUMA: Enabling NUMA allows a virtual machine to efficiently use CPU cores and memory on systems with multiple processors or NUMA architecture, optimizing memory access by reducing latency and improving performance for workloads that require significant resources, such as databases, large-scale applications, or nested virtualization.
- Why you might not enable NUMA: If the virtual machine is small (e.g., using only 1-2 CPU cores and minimal memory), enabling NUMA may introduce unnecessary overhead without noticeable performance benefits, especially on systems that do not utilize NUMA architecture. (Default: Leave disabled)
- For optimal performance and security on a Windows 10 VM, enable:
- Memory: Assign at least 4 GB (4096 MB).
- Network: Model: “VirtIO (paravirtualized).
- Before clicking ‘Finish,’ ensure that ‘Start after created’ is disabled. This allows you to make final changes or proceed to the next step. Click ‘Next‘ when ready.
- OS Section: Under “Use CD/DVD disc image file (iso)” select your Windows 10 ISO. Then under “Guest OS:” Select: “Microsoft Windows”. Tick the “Add additional drive for VirtIO drivers” and select the VirtIO ISO image.
Step 3: Install Windows 10
- Open the console to access the VM. Click ‘Console‘ in the top-right corner on your VM. Do not start it yet.
- Click “Start Now” and be prepared to press ‘Enter‘. When you see “Press Any Key to Continue to Boot from CD or DVD” press ‘Enter‘. Be patient, the installer should pop up next.
- Follow the Windows installation prompts:
- Choose language and region settings. It’s important that you choose your keyboard or input method before continuing the installation if you’re not from the United States.
- Click ‘Next‘ and “Install now“. Enter your Windows license key or skip this step if you plan to activate later (or not) by pressing “I don’t have a product key“.
- Select operating system: Usually this is Windows 10 Home. If you’re testing out Windows you can try the other images. Please keep in mind that the “N” editions of Windows 10 include the same functionality as other editions of Windows 10 except for media-related technologies. The “N” editions don’t include Windows Media Player, Skype, or certain preinstalled media apps (Music, Video, Voice Recorder). We’re going to select Windows 10 Pro. Select the version you want and press “Next“.
- Accept the license terms and press “Next“. After this, select “Custom: Install Windows Only (advanced).
- You’ll get a warning message starting “We couldn’t find any drives. To get a storage driver, click Load driver“.
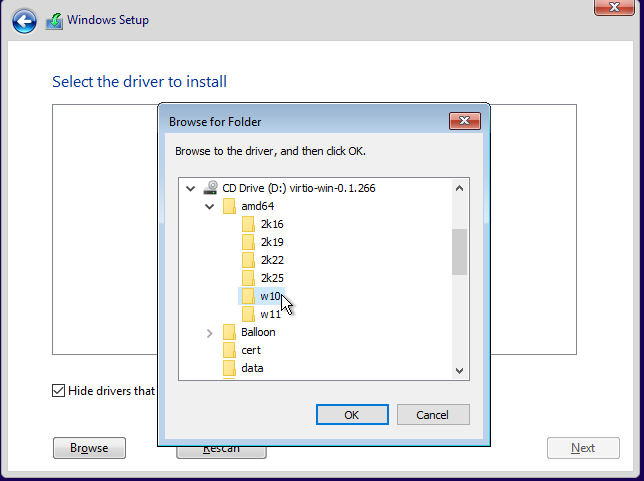
- Click on “Load driver” > “Browse” > “CD Drive for VirtIO” > “AMD64” (even when using Intel) > “w10” > Then press “OK”

Windows 10 – VirtIO Drivers - “Select the driver to install“: “Red Hat VirtIO SCSI pass-through controller” should be in the list, press “Next“
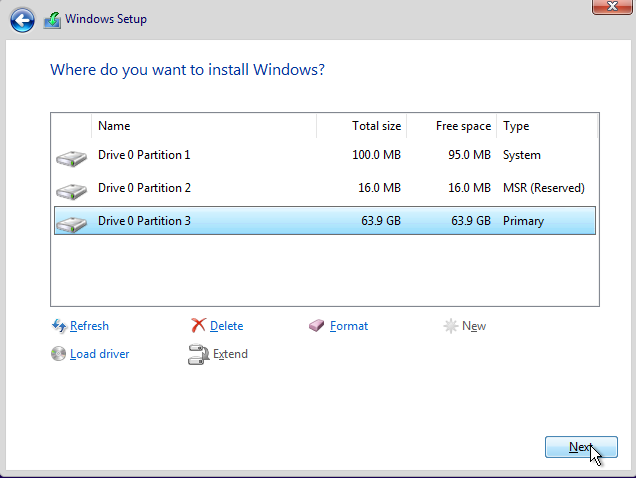
- Partition the allocated storage and begin the installation: Press “New” on your 64GB drive > Press “Apply” > “OK” > “Next”

Windows 10 is now ready to be installed on your VM drive
- Wait for the installation to complete and let the VM reboot as needed.
- After rebooting, you should be prompted with finalizing your Windows 10 VM.
- On the “Let’s connect you to a network” section, press “I don’t have internet” in the bottom-left corner. Then “Continue with limited setup“.
- Wait for the setup to finish.
- To fix an internet connection on this VM using “VirtIO (paravirtualized)”:
- Right click on the Windows icon in the bottom-left corner.
- Press “Device Manager“
- Under “Other devices“, you’ll see “Ethernet Controller“
- Right-click on the “Ethernet Controller” and press “Update driver“
- Press “Browse my computer for drivers” > Click on “Browse…” > Select your VirtIO disk station > Press “OK”.
- Do the same steps above for “PCI Device“
Common Issues and Fixes
Even with the best preparation, you might encounter some hiccups. Here are common issues and how to solve them:
- Issue: Windows Installation Stuck
- Solution: Ensure UEFI boot is enabled in the VM settings and recheck the ISO file for corruption.
- Issue: No Network Connectivity
- Solution: Verify that the VirtIO network driver is installed. You may need to manually install it from the VirtIO ISO. You need to do this after finalizing your Windows 10 setup.
- Issue: VM Not Booting After Installation
- Solution: Double-check that the boot order in the VM settings prioritizes the installed disk over the ISO.
- Issue: Windows 10 is running slowly.
- Solution: Adjust CPU and RAM allocation in Proxmox, enable NUMA, and ensure VirtIO drivers are installed.
Final Touches
Once Windows 10 is installed and running, consider these steps for optimal performance:
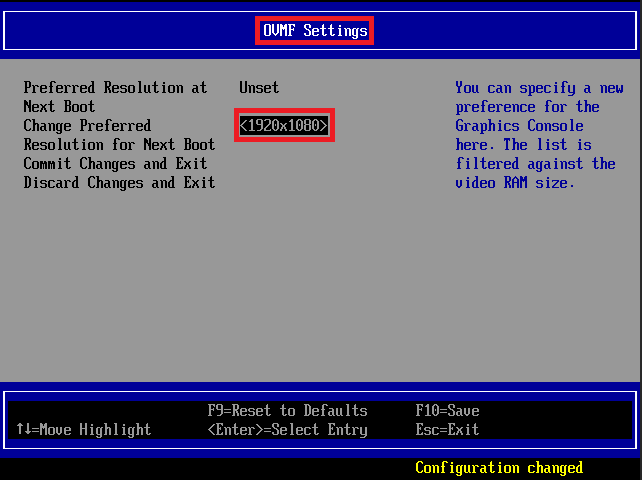
- Adjust screen size: Shut down your VM, completely. Open “Console” and start the VM. Repeatedly press “ESC” to enter BIOS.
- Navigate down to “Device Manager” using your arrow keys and press ‘Enter‘.
- Go to “OVMF Platform Configuration” and enter.
- Press ‘Enter‘ on “1280×800“
- Enter your desired resolution e.g. “1920×1080“, and press ‘Enter‘.
- Press ‘F10‘ to save changes, then ‘Y‘ to confirm.
- Press ‘ESC‘ twice to return to the BIOS menu, then select ‘Continue’ to boot into Windows.

Since we’re using UEFI, the screen resolution needs to be adjusted in the BIOS settings, as shown above. - Another Tip: Allow Proxmox to use Local Scaling. This ensures the display scales smoothly and maintains usability when resizing the console window.
To enable Local Scaling:- Open the Proxmox Console for the VM.
- Click on the “Scaling Mode”
- Select “Local Scaling” from the dropdown menu.
This will allow the display to scale smoothly as you resize the console window.
- Enable Windows Updates: Keep your system secure and up-to-date.
- Install Additional Drivers: Check Device Manager in Windows to ensure no devices are missing drivers.
- Optimize Resources: Adjust CPU and RAM allocation in Proxmox based on your usage needs.
- Activate Windows 10: While not strictly necessary, activating Windows 10 unlocks its full functionality, such as personalization options, customization features, and access to all system tools.
Frequently Asked Questions (FAQ)
- Q: Can I take snapshots of my Windows 10 VM?
A: Yes! Snapshots allow you to save the current state of your VM:- Go to VM > Snapshots > Create Snapshot. (It is highly recommended to leave “Include RAM” unticked as it is not necessary).
- Give the snapshot a name and save it.
- You can restore it anytime if something goes wrong.
- Q: What’s the difference between Windows 10 Home and Pro editions?
A: Windows 10 Pro includes features like Remote Desktop, BitLocker encryption, and support for joining a domain. Home edition is simpler and cheaper but lacks these advanced features. - Q: How do I enable GPU passthrough for better graphics performance?
A:- Enable IOMMU in your BIOS.
- Configure the Proxmox VM to use PCI passthrough.
- Assign a dedicated GPU to the VM in VM > Hardware > Add PCI Device.
- Install the GPU drivers in Windows 10.
- Q: Can I use this VM for gaming?
A: While Proxmox supports GPU passthrough, gaming on a virtual machine is generally not recommended due to potential performance loss, input lag, and hardware limitations. Performance will heavily depend on your CPU, GPU, and proper passthrough configuration. For serious gaming, a native Windows installation is still the best option. - Q: Is it safe to use unlicensed Windows 10 in Proxmox?
A: While Microsoft allows the use of unactivated Windows 10 with limited functionality, it’s best to use a valid license to comply with their terms and unlock features like personalization, updates, and additional tools. - Q: Can I run multiple Windows 10 VMs on the same Proxmox host?
A: Yes, but you’ll need to allocate sufficient CPU, RAM, and disk resources for each VM. Monitor performance closely to ensure the Proxmox host doesn’t become overcommitted. - Q: What’s the benefit of using VirtIO drivers instead of default emulated devices?
A: VirtIO drivers provide:- Better performance for disk and network operations.
- Lower CPU overhead.
- Faster I/O speeds compared to default emulated devices like IDE or E1000.
- Q: How do I enable sound in my Windows 10 VM?
A: Add a sound device to the VM:- Go to VM > Hardware > Add.
- Select Audio Device and choose a backend (e.g., ALSA or PulseAudio).
- Install the appropriate audio drivers in Windows.
- Q: Can I access my Windows 10 VM remotely?
A: Yes! You can enable Remote Desktop Protocol (RDP) in Windows 10 Pro:- Go to Settings > System > Remote Desktop and enable it.
- Use an RDP client to connect from another device.
- Q: Can I pass USB devices to my Windows 10 VM?
A: Yes, you can attach USB devices directly to the VM:- Go to VM > Hardware > Add > USB Device.
- Select the USB device from the list and confirm.
- Start the VM, and the device should appear in Windows.
Conclusion
And that’s it! You’ve successfully installed Windows 10 on Proxmox. Whether you’re using it for testing, learning, or productivity, this setup is robust, versatile, and capable of handling a wide range of tasks. By leveraging Proxmox’s powerful virtualization features, you now have a dedicated virtual machine that can operate just like a physical computer—without the added hardware costs or complexity.
From setting up UEFI, configuring display resolution, and installing drivers to optimizing resources, you’ve built a solid foundation for a stable and high-performing Windows 10 VM. This environment is perfect for experimenting with software, running legacy applications, or even setting up a small remote workstation.
If you found this guide helpful, consider sharing it with others who might benefit, or check out our other Proxmox-related tutorials to explore advanced features like snapshots, backups, and network optimization. Virtualization offers endless possibilities—so don’t stop here.
Happy virtualizing, and enjoy your fully operational Windows 10 virtual machine!

